
Ten minutes from our shop in Skowhegan, Maine, Rick Anzelc purchased a 1830’s Greek Revival farmhouse, ell, wood shed and barn where he had lived as a boy. Recent previous owners/tenants had not treated the home well, and after the last tenants left the abandoned house suffered the loss from theft of all the copper wiring and pipes. After Rick bought the house, he decided to strip it back to its bare bones of frame, sheathing, chimneys, hearths, floors, and start over. When I was approached by Rick to consider the job of restoring the kitchen ell fireplace complex (consists of oven, fireplace and cast iron cauldron or set kettle), he told me that his wife Tina had agreed to move back to his childhood home on the condition that he would restore the fireplace complex, making the bake oven and fireplace particularly functional once again.
Early fireplaces and chimneys were built with unlined single wall or double wall brick construction before the invention of fired clay flue tile liners. There are four fireplaces in the Anzelc home. Three are in the primary rooms downstairs (main house) and the fourth is in the lovely timber framed story and a half kitchen ell. All four fireplaces were built with lime mortar and single wall construction. The three main fireplaces each heated separate rooms. The chimney from the front room fireplaces stepped over in an A frame form construction and became one mass opposite the front door. The rear room fireplace of the main house went pretty much straight up to the roof. The two front room fireplaces, after joining into two united flues, stepped a second time to the rear to join the rear room fireplace mass. All three flues then joined and passed through the second floor and out of a single large 32 x 36 chimney at the center of the roof. The rear fireplace flue had been converted to a code approved wood burning stove set up with the addition of an insulated 6 I.D. flexible stainless steel liner. All three main fireplaces in the last 50 years or so had been modified with an additional 8 of facade depth to accommodate modern cast iron fireplace dampers. The new extended brickwork had been built with modern Portland cement based mortar and had been painted red. A basement oil boiler had also been installed in the previous 70 years and a brick veneered flue for the boiler punched up through the floor in the A frame space and was let into the back of the rear fireplace flue, bringing the use pattern of this chimney to include four appliances. On the second floor, Rick discovered an old cast iron thimble which indicated that a wood or coal stove had at one point been hooked up to this chimney in a bedroom. All of the original rooms of the main house had been isolated from one another with six panel Christian doors and each room was heated individually with wood as it was being occupied. A great deal of wood was probably burned, although I suspect that much colder indoor temperatures were tolerated in the 19th century than today by most Americans.
In the main house, it was Ricks intention to remove the paint/clean up the brick work, remove the second floor cast iron thimble and repair the brick facade. He would patch any freeze/thaw damaged bricks on the main floor fireplace chimney and restore the above roof portion of the chimney and add a substantial cap to the chimney.
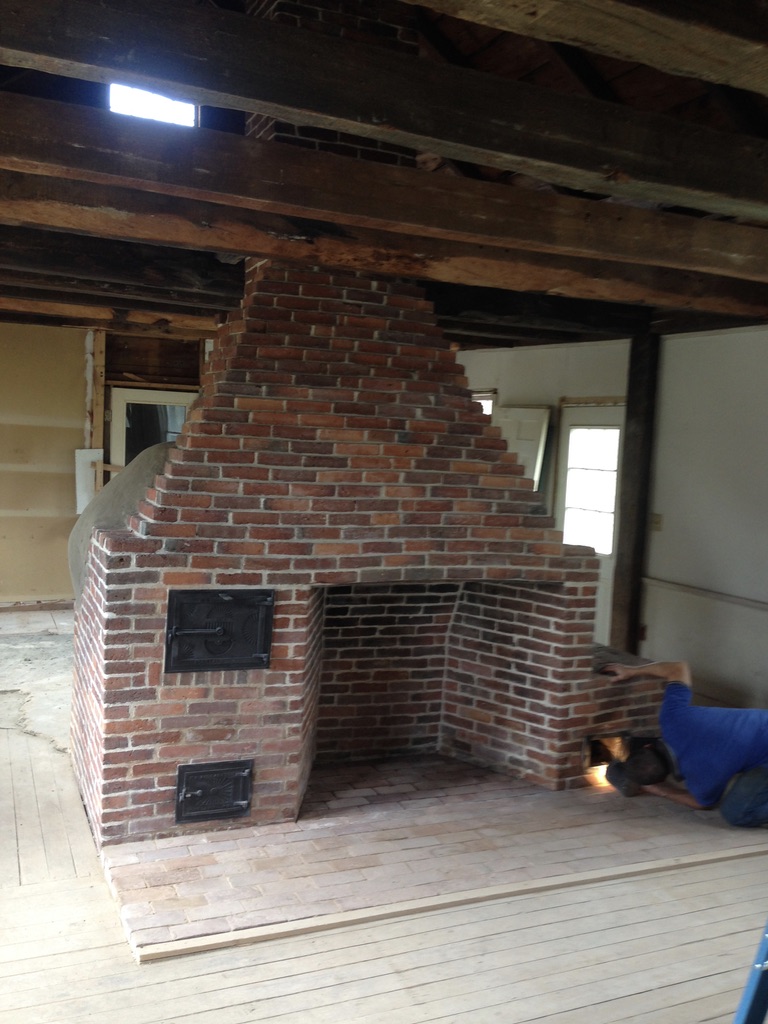
The much bigger challenge was in the kitchen ell. The workhorse portion of the wood fired systems of old. The hearth (already replace once), was worn and out of level. The bake oven was badly cracked and in poor shape inside and out. The original bake oven door had been replaced by an inappropriate smaller door with crude brickwork around it and the ash box door below the loading door was also a more recent (51-75 years old) replacement with poor brickwork around it. The large cooking fireplace was cracked in many places on its face and had many damaged or cracked bricks inside the firebox. The fireplace had also settled somewhat relative to the height of the two sides of the complex due to the weight of the chimney above and the loose fill in the foundation below the fireplace. The once hidden plaster and lathed brickwork above the fireplace opening, now all exposed, was sagging with cracked bricks in many places. The large cast iron set kettle had a broken firing door low on the front face of the brickwork and the bricks all around the large heavy kettle were badly cracked and broken, settling on all three sides. The interior walls of the set kettle were all badly damaged and falling apart. With the inner wall of the set kettle firebox in failure, many of the exterior brick around the top were around the kettle rim were pitching and starting to fall into the void. The outside walls, suffering from overheating were starting to push out.
The rear wall of the fireplace where there had once been a 12 x 16 step in opposite the set kettle flue passage to the upper portion of the fireplace flue, had been badly filled in with modern mortar and brickwork. High on the rear fireplace wall, the veneer had been broken in order to poorly accommodate a wood stove and a clean out door. Nearly 100 bricks in the back wall were cracked or badly broken and would need to be replaced.
The back ell chimney was large and tapered on the inside, getting smaller as it rose above the three working parts of the complex whose three flues all came together into one at about the 6′ level. The chimney also kicked over a bit as it neared the roof in order to exit more closely to the center of the roof. To bring the kitchen ell fireplace up to modern safety codes, we needed to figure out a way to line the tapered and canted chimney with a refractory material of some sort. After consulting with a restoration brickwork friend, I was steered to an outfit in Southern, Maine that has dealers around the country with a patented German origin system that utilizes a pumped and pressurized revolving sprayer lowered down a chimney on a rope to deliver multiple coats of refractory material. It is pumped up to the sprayer and spread on all the inner surfaces as the sprayer head revolves on pressure from a compressor on the ground. The closest dealer was located in Portsmouth, New Hampshire. He would not come, saying that the 2.5 hour drive to Skowhegan was too far, but suggested a dealer in Connecticut who liked to travel and specialized in restoration work. We reached out to the Connecticut dealer sending photos of the fireplace and he agreed to come after winter when the weather warmed up enough to keep the mass above freezing. After several cold weather delays, this three man crew (father, son and helper) came and worked for three days on the project with some heat provided by a large kerosene fueled heater that we had set up for our own work in the back ell. Working from the ground floor level up inside the oven and fireplace, the crew applied three or four layers of the refractory slurry and then worked from the chimney top down with the revolving sprinkler system. I had them cap the chimney with a piece of plywood to control heat loss before they came down off the roof.
Under my nervous and watchful eye, the Connecticut crew proceeded to sandblast all of the first floor fireplace surfaces, the oven, and set kettle system. This blasting removed all the old paint quickly and effectively but also slightly pitted the surfaces of the fireplace complex brickwork. We were, however, very grateful for the work because we now had a code approved chimney to work with and no need for a very complex and expensive chemical paint removal process.
Our team (Nate Pooler and I) began our restoration and reconstruction work by tearing up and replacing the hearth. We removed all of the old hearth brick and Roto-hammered into the so called concrete under the hearth and discovered that it had no aggregate in it, but did have some odds and ends of metal for reinforcement throughout. We were amazed when we eventually recovered separate pieces of an entire antique cast iron wood stove, a blacksmith vice and numerous other scrap metal parts from the hearth slab. Beneath the slab we discovered a very dry infill of sand, shaley rock, and gravel poured inside a very large dry rock slab perimeter construction perhaps 10′ x 12′. This supported not only the fireplace mass but some of the carrying beams as well. The dry rock and granite slab foundation of the perimeter of the house, a couple feet away from the fireplace foundation, had leaked a good bit of water over the years, and looked as though some of the roof water had entered through the house perimeter wall and pulled out some of the finds from the dry stack fireplace foundation. This and the weight of the chimney had caused the center of the fireplace to settle a bit. With this massive weight still in place above, we could not raise the fireplace but could repair it in such a way that the brick courses flowed into one another rather than being broken up with steps of settling. Above the oven door, the pitch from left to right was over an inch out of level and the entire bake oven front was cracked, misaligned and badly damaged. We checked in with Rick to get his calculation on where he wanted the final restored wooden floor height to land and then formed up the hearth area and poured a new reinforced level concrete slab for the restored hearth to sit on. We excavated beneath some of the base course of the fireplace firebox so that the concrete slab would pick up some of the weight of the massive settled chimney. Once the concrete slab was cured, we removed the forming materials and laid in the new hearth.
All the bricks of this 1830’s fireplace measured over 3.5 wide by nearly 8 long and only 2 thick. Rick had a number of old brick available, but none matched the desired size. Luckily, I had a supply of these same era 2 thick bricks salvaged from the above ground wall of my big barn. It had required removal and replacement of the brick capped heavy granite block wall that had frost heaved into the void beyond repair over the course of its 180 year life. I still hope one day to replace the above ground brickwork (once 12 or three courses deep), but this can be done now with an 8 thick backer wall of concrete block and a veneer wall of the antique brick. For now, the gap is filled with pitched OSB panel sections while I wait for my ship to come in. If my pile is not big enough to do even the single brick wall, I found another 1830’s home in town that burned down which has a few pallets of the salvaged brick in my size.
1830’s hearth firebox floors and bake oven floors were laid dry with no head or bed joints of mortar. They were instead laid on a floor of hard packed sand. This system, which we still use today in our Le Panyols (where Grog is used instead of sand), allows the firebox floors to expand and contract without breaking apart during fires. Any gaps between the bricks quickly fill with compressible ash. In the East Madison project there is no heat to worry about in the hearth extension beyond the firebox since it will be frequently walked on. We laid these bricks with no head joints on a thin bed of high lime mortar. The tight fitting head joints using the antique bricks retains the look of a traditional period hearth. After the bed joints had dried I came back and sifted a dry mix of mortar into the fine cracks, brushed off any surplus then wet the joints with a sprayer to that the mortar would set up. Some weeks later, after a break for a masonry heater project elsewhere in Maine, my mason partner Peter Skove did a light acid wash on the restored antique brick hearth and it came out looking both clean, delightfully old and in perfect harmony with the rest of the fireplace mass.
Nate and I, before Peter joined the project (in the acid wash and chimney restoration phase), decided to work in tandem by having me replace broken and cracked bricks in each face of the system while he worked on grout removal and broken brick removal on an opposite face of the system. In keeping with the original construction, we used a mortar of only lime and sand. Our lime was a modern dry packed mason’s lime and not the same as the ancient artisan crafted aged lime putty that would have been more commonly used in the 19th Century. Our sand was a fine blond sand and the combination of these two elements created a color and texture almost identical to the original mortar look. Modern mason’s lime is not as cementitious as the older lime putty, but it was sufficient for our indoor work. We were able to remove bricks fairly easily by grinding out some of the original mortar. Once a groove was established, we could easily travel around the brick with a carbide tipped 1/4 drill bit and drill on hammer mode to deepen the groove to the depth of the brick while releasing it from the wall. Every joint from the floor to the roof was ground out and drilled to a depth of about an inch and then repointed. Our original thought had been that we could preserve some of the mortar joints and replace only the worst spots with new mortar, but we found weak and cracked mortar everywhere, so we decided to replace all of the mortar. Nate, with a great eye for detail, did most of the grinding and repointing while I started on repairing the bake oven first.
We stripped all the original sand/lime stucco layer off the oven down to the original double wall brick work and ground out and repointed the outer layer of brick. Our Connecticut liner friends had already sprayed the inside of the oven bricks to stabilize and seal it. To continue the work on the oven, I raced down to Bowdoinham where our next masonry heater project was scheduled in another early 19th Century farmhouse. Our clients there were converting the kitchen and bathrooms to modern appliances and, in general, restoring and tightening up the house. They too had an original oven, but wanted to replace it with a masonry heater with a heated bench on the front and an unheated bench on one side. The bake oven firebox door and the ash chamber door were beautifully cast with the makers name and Portland, Maine embossed on the surface. The bake oven door was larger than the replacement door in East Madison and better sized to the Anzelc oven as well as available to me for recycling. In a few minutes I was able to release the doors with my Roto-hammer drill. Back at the shop, I stripped them down to bare metal with a small sandblaster. The bake oven door was missing its half moon shaped draft control, so I had Brock fabricate a new one out of steel. I put several coats of high temp black paint on the doors and took them back to the job site. The entire oven face from floor to oven top was badly damaged so I disassembled all the broken and damaged brick and started to rebuild the oven veneer. The Portland antique door had the classic arched extension on the back of the frame along with the intact guillotine damper plate, but the old brickwork of the oven had been damaged and ripped out in that part of the oven, so I made up a styrofoam plug form and poured a new arch section (where the Portland door arch element would be) with refractory concrete reinforced with stainless steel needles. This new lintel smoothly closed off the damaged gap and fitted snugly over the Portland door.
In the process of forming up for the pour, I stabilized the sinking right side of the opening with a small hydraulic jack and was able to pull out, clean up, inspect and reset the original hand forged flat bar lintel that spanned the door. While cleaning the lintel, we were delightfully surprised to find that the Smithy had stamped his personal brand three times into the upper surface of the red hot metal. I carefully photographed the best of the three stamps before replacing the lintel and made a high quality print of the unique and only original I.D. mark on the oven/fireplace complex. I am hoping that folks reading this blog might help shed light on this image or tradition. It has an esoteric quality to it. I have also passed the image on the Maine’s premier antique tool collector and seller at Liberty Tools.
We set the restored doors in the brickwork level, but let the brickwork around the doors follow the downward slope to the center that the fireplace had assumed after almost 200 years. Inside the oven, the sprayed in place liner had lots of ridges and pimples, so I grounded all of these smooth with a diamond flat faced grinder attached with duct tape to a broom handle. Nate held a shop vacuum nozzle at the oven door opening while I ground smooth the oven floor. Nearing the end of the first floor restoration, I had the idea that it would be fun to do a test burn in the oven to check its draft, but it drew very poorly and smoke seeped into the room from around the door and down through the fireplace opening. The oven flue enters the fireplace flue at about 6′-7′ in height. I remembered that we had asked our Connecticut liner friends to put a plate of plywood on top of the chimney after they finished their sprayed liner work. Chastened, I raked out the remaining coals and burning wood and humbly set the pile outside in the driveway and dowsed it with water. Mr. Smoke is always willing to co-operate with a good oven, heater, or fireplace and chimney design, but cannot do the impossible. We knew that the break-in burn would now have to be delayed until after the job ended because putting the cap on the back ell chimney was the very last thing we were going to do on the overall project and without tall handmade staging straddling the roof, we could not get to the plywood cover.
Where the bake oven facade met the edge of the fireplace opening, there were cracked and broken bricks. Within the firebox there were many cracked, broken or eroded bricks as well and some of the corner bricks at the opening were damaged badly. I worked to remove and replace all of these damaged bricks associated with the main fireplace next while Nate kept working on mortar removal on the sides and rear of the fireplace. We did not have any of the 45 degree angle bricks defining the opening of the fireplace firebox, so I decided to try to duplicate these shapes by cutting down a full brick to the correct shape then softening the cut face with a flap grinder and coarse sandpaper. Within the fireplace firebox we pulled out/replaced 30+ bricks and of course had already used a great number of replacement antique bricks in the restored facade of the oven. I kept thinking that 30 or 40 bricks from my back forty brick pile would finish the job but we made repeated trips to the pile to get all the replacement bricks that we ultimately needed. Once I completed a structural element, Nate would move in behind me and refill (point) the joints with flat jointers and slicker trowels. Once we got the hang of it, things went very smoothly and efficiently.
Although the set kettle was next in line, I decided to postpone restoration work on it and jumped around to the back of the fireplace. We observed that the backside of the fireplace was once a separate room from the main fireplace and likely the task of using the set kettle, washing clothes, etc. occurred in this back room. Directly opposite the set kettle in the back ell was an outside door in the sidewall of the building and just a few feet beyond the door was the original stone lined hand dug well. Try to calculate the thousands of gallons of water that might have been drawn one bucket at a time from the well, carried up a couple of steps into the back well and dumped into the drain free kettle (approximately 30 gallons). Who in a family might have had the chore of bringing water in from the well to the set kettle? Beyond this back room was a woodshed so wood for the fireplace, oven, and the set kettle (which were all fired from the front face), was carried through this originally separate back room. Beyond the woodshed was a small attached barn which placed this set of buildings squarely in the stay inside in the winter architectural tradition in Maine of what was called the Big House, Back House, Little House, Barn sequence. Opening and closing the side door to the well and the rear door to the wood shed would have allowed cold air into the house so the original stud, lathe and plaster partition wall between the rooms may have served the vital service of keeping the cooking and baking areas much warmer.
Underneath the set kettle, with its large cast iron resting on the brickwork a couple feet off the floor was space for a fire. The firebox door was small so wood prepared for the kettle would have been split fine to burn hot and fast with frequent reloading. Sadly the original cast iron door with a lovely image of lady with long hair emerging from a flower (perhaps a lily), had a break in the lower corner of the door frame. I thought that we would not be able to use the door, but my intuition led me into my own chock full 40-50′ timber frame barn where I found on a metal shelf another damaged small period cast iron door with the same rim border. My damaged door had a different corner broken on it, so I took both doors to our shop and gave them to Brock, our master welder. He trimmed the break on the Anzelc door to a curved cut then cut a matching piece out of my door frame from the barn. He welded them together with the heavier bead of my door frame. With a grinder he trimmed back the thicker bead on my frame and after we ground and polished the welded seam and painted the door, the repair virtually disappeared and the lily lady was born anew.
Returning to the back wall, we realized that we would have to pull out a large number of damaged or cracked bricks along the base and the first two or three up the wall. We would also have to pull out the galvanized thimble and cast iron clean out door higher up that had been punched in to allow a wood stove in this rear room when there had still been a partition in place. I was concerned to restore the set kettle flue as well since it seemed foolish to me to restore the veneer and firebox liner of the set kettle and not have it be able to draft even though Rick assured me he would never use it. Maine has had extended power outages in the past and will certainly do so again. Lifestyles can change in a hurry when everything we take for granted (like hot running water and electricity) suddenly disappear for an extended period of time. Out came the thimble and clean out door. I stood up inside the fireplace itself and repaired the partition wall high up in the back at 6-7′ feet that defined the entrance of the set kettle flue into the main chimney.
The original step in between the set kettle rear wall and the bake oven rear wall had been filled by someone with newer bricks and Portland cement based mortar. We slowly and carefully removed all this filled in work then repaired and replaced all the broken/cracked brick in the pocket. We determined where the original flue from the set kettle had entered the void behind the fireplace firebox back wall and cleaned it of a 100+ years of soot, broken bricks and other debris. I drove to Thorndike, Maine to visit my old friends the Bryants, who have been restoring antique stoves and cookstoves for 40 years or more. I picked through a number of antique square cast iron clean out doors with round covers and found one I liked. We installed the antique door at the upper corner of the original brick pocket on the rear wall which gave us access to the horizontal run from the set kettle firebox into the fireplace back wall set kettle vertical run. We now had reestablished a full clean out capability to all of the tail end portion of the set kettle firebox system. With a new set of antique bricks in place, I was able to shift to the most difficult reconstruction challenge of the complex, which was the badly damaged set kettle system around and under the set kettle. I started with the front face and removed about 2/3s of the brick and pulled out all of the front face and side liner brick that I could reach. I also shimmed up the set kettle with some removable supports under its center so I could work on one wall at a time and not worry about the kettle settling further. The new hearth was one course higher than the original hearth in order the accommodate the floor leveling plan so I raised the lily lady loading door up one course and rebuilt the inner and outer walls. The wedge cut bricks on the top surface which keyed in around the set kettle lip had to be supported somehow, so I formed up another stainless steel needle reinforced refractory lintel behind the loading door and created a solid structure there and added a little mineral wool layer for expansion, and then laid replacement antique bricks above the lintel.
The (right) outside wall of the set kettle was in very poor shape and had to be almost entirely disassembled and relaid. The benefit of all this deconstruction allowed me to get really good access to the inner wall reconstruction which in the 1830’s was laid without the kettle in place. With the right side repaired and restored. I could do the back wall and it too required extensive reconstruction. The top course of bricks was in very bad shape so I opted to recut and replace them. Thin wedges in the original brick work along the outside rear wall edge I decided could be eliminated by finding a couple of extra lone (8.5) bricks in my 2 thick brick pile. These bricks carried the circle of wedge bricks neatly to the outside line of the back wall. Steel lintels were placed under the few bricks making the transition from the set kettle body cavity to the set kettle chimney flue.
Somewhere in the sectional restoration process, we added a layer of French Le Panyol oven refractory mortar to the exposed brick oven. On top of this layer I added a couple inches or more of high temperature fiberglass blanket and covered this blanket with aluminum foil. The foil added a reflective layer but also a water barrier to keep moisture from additional layers of stucco from being absorbed by the insulation. Above the foil, I applied a layer of hardware cloth wire mesh and secured this mesh to the brick work with a number of tapcon screws and large washers. On top of the mesh we added a couple layers of lime and sand mortar. When it was dry added another harder shell of the French refractory mortar and when this was dry a layer of white mortar to match all of our repointing.
While all of these section by section repairs and rebuilds were unfolding, Nate had completed all of the first floor repointing and had moved by ladder to the second floor timber framed loft, making a platform around the chimney with our staging planks and some spare sheets of plywood. With a dust mask, glasses or a face shield and ear plugs in place, Nate moved carefully on around and up the chimney, taking out all the old mortar and placing it with the new lime/sand mortar mid. Ten feet up above the heavy ceiling beams, near the roof penetration, we knew we had a problem. From two feet below the roof line to more than ten feet above the roof penetration, the chimney had been rebuilt and the mason had plastered a couple of large sections of the near roof chimney portion with modern mortar, probably to cover damage or creosote seepage. This Portland cement based mortar could not be easily removed. A few weeks on the job gave us some time to think about this problem. I suggested to Nate that he follow the original vertical and horizontal mortar lines on the plastered face and grind them out with the diamond grinder. Then I had him make a few cardboard stencil templates of the existing brick face shapes. I suggested that he take a handful of the antique bricks to the local Agway store and pick out two or three spray paint colors in the red range that approximated our brick colors. With the paints in hand he was instructed to go back to the mortared sections and spray paint new bricks onto the plaster through the stencil shapes. With a variety of painted bricks now covering the plastered face, he repointed the hole with our high lime mortar and the upper section of the chimney suddenly became indistinguishable from the brickwork below it. Nate completed all this work, while I was working on the Bowdoinham heater project which had been the source of the bake oven doors for this project.
A few weeks later after the Bowdoinham project and some other chores, the new crew of Peter Skove, Kevin O’Meara and I returned to the East Madison to complete the final phase of the restoration project. During this period, Peter acid washed the hearth and added the final stucco coat to the bake oven. Most cleaning of the main floor fireplace mass was done with water, sponges, and fine sand blasting while the work was being done. We used very little acid on the brick cleanup of the lime/sand mortar mix and work.
Our next big task was the repointing and restoration of the front chimney above the roof and the addition of a heavy cast rain cap for the front chimney as well as a cap for the back ell chimney. Above the roof we knew that we wanted a more durable mortar but a mortar still suitable and safe and more flexible for the antique bricks used in the chimney. I was very fortunate to reach by phone the well known Maine restoration mason, Richard Irons. He gracefully offered me the formula that he would use in this circumstance. It consisted of eight parts sand to two parts type S (softer than type N) white masonry cement, and one part mason’s lime. As we had done below, we ground out all of the joints to a depth of roughly an inch and replaced all of the broken and badly cracked brick and pulled off the failing lead flashing and repaired all around the line where the lead flashing had been cut into and laid in the brick work. We knew that the entire metal roof was to be replaced soon after our departure so we consulted with the roofer and learned that they intended to do their own flashing with the same metal used in the new roofing. For a temporary waterproof seal we installed strips of Snow and Ice Shield and wrapped the shield with duct tape to help hold it in place until the roofers arrived.
The roof was steep, slippery, and tall. Much of the work involved carefully staging the roof to work safely all around and above the chimney. We scooted ladders on rollers up both sides of the chimney and flipped them over to engage the ridge hangers. We mounted our heavy steel saddle roof brackets on either side of the chimney and bolted four planks into the brackets to give us a saddle down both sides of the roof. On one side of the chimney (the side more below the peak), we spaced and mounted folding roof staging brackets and mounted a short set of pipe staging with aluminum and plywood staging planks. We screwed down the saddle planks (knowing that the roof metal was soon leaving) and also roped off the lighter weight side of the saddle system, and added wooden folding roof brackets and a double plank on this lighter side and then bridged across from one side to the other with additional planks to give us a safe scaffold all around the chimney. Kevin did much of the climbing up and down the chimney and Peter did much of the mortar removal. Kevin and I repointed the chimney and waited for Peters return from a quick trip to New Jersey to mount corner columns and to pour the cap. We installed thin stainless steel plates underneath the pour on both chimneys to protect the concrete from acid erosion. Each plate had a number of short l shaped anchors welded to the top side to lock the plates into the concrete pours. We used black mortar color to create a dark slate colored cap. We formed the cap with two by fours just outside and around the chimney and two by fours on edge on the outer edge of the flat two by fours to create a 3.5 thick cap slab that would overhand the chimney by about 2 all the way around. Before pouring the cap, we duct taped all the inside surfaces of the form to avoid moisture being sucked into the two by fours and we drilled and brad nailed on a small half round dowel about 3/4 from the edge of the form to act as a drip edge. This would give us a modest rounded groove which would force the water to drip down outside the face of the chimney rather than moving laterally under the cap slab towards the chimney. We sealed all the joint gaps with silicone and/or duct tape, mixed the concrete on the ground and hauled it, bucket by bucket, up the ladder, finishing and covering a slightly domed cap just before a violent lightning and thunder rain storm hit us. With weather conditions very wet, we waited three days to completely remove the form, but were able to do a nice acid wash on the chimney the first day after the pour.
When the cap slab was really firm, we removed the rest of the forming and filled any little surface voids with black mortar and smoothed the edges with coarse sandpaper. Once the staging was all down, we had to move it around the corner to the back ell and set it all up again for the second chimney. Because the second smaller but taller chimney rose directly through the peak, we built a wooden staging without the pipe staging. We weld four pieces of 4-5 long 1/4 thick steel rectangular tubing to strap hinges and after we set our big saddles and properly spaced planks over both sides of the ridge, we set the tubing pockets at equal distances down the 2 by 8 saddle planks at a horizontal distance apart of 8′ and insert 10′ or 12′ tall two by four’s plumbed and screw anchored with lengths of strapping to the planks. We built horizontal layers of scaffolding about 18 apart for each step. We screwed short two by four vertical pieces under each horizontal support element at the four corner tall vertical members. We then lay sets of staging planks around the chimney for each step in the system. With the chimney already built, we did not require full rounds on each step and only needed to create a way to get to the top layer that would give us access to the cap zone of the chimney. his time we built a similar form, but used heated water to accelerate the cure on the black concrete and did quite a bit of vibrating of the pour with the head of a portable drill in the hammer mode. This brought a lot of air bubbles to the top of the pour. We tacked on some two by four spacers on the outside top edge of the form and then a larger sheet of plywood over the spacers and a tarp over all, for a rain proof overnight. The next day, the slab was solid enough to remove the form and to take down the staging.
Inside the main house, Peter and Kevin worked on the rear fireplace and ground out all the powdered freeze thaw cycle damaged layers of individual brick and covered the majority of that fireplace with the French Le Panyol refractory mortar. All of this work would be sheathed later with proper code clearances. Still left to do is the design, fabrication and retrofit of a sensible plug or damper for the back ell fireplace. This metal work we will leave to Scott and Brock to devise in the shop. Without a plug or damper, huge heat losses will occur up the chimney in the ell. We will be sure to follow up with more photos when the living space around the fireplace completed is completed and pizzas are coming out of the oven.
Although I live in an 1830’s home and have two ovens and three fireplaces and three chimneys and have done extensive repairs, I had never had never sought out or been asked to do an extensive restoration project for a client before. It was very challenging but a lot of fun to do to bring back a system from near death to new life and to piece together designs of the first mason and to get a chance to relive how the system was fully used and how all the activities in the house flowed from this central hearth built before cookstoves existed, before there was power and before there was power and before there was running water. Every day water was probably being heated. Bread and biscuits and pies were likely being baked and food was cooking from a crane and kettles in the fireplace and the fire was radiating heat into the space. There was structure and space above as well, where some folks could easily have slept in the warm, albeit uninsulated, loft area.
I hope we get a chance to another project of this sort someday.
Albie Barden
July 2015
