
Reeve and Hannah Wood purchased an early 19th century farmhouse in Bowdoinham, Maine just off the undeveloped exit on I-295. Reeve and his brother (a carpenter) have been putting in new bathrooms, a new kitchen with an antique stone sink, new windows, and other major upgrades/improvements during their reconstruction project. The four person family have been living and sleeping in the bedroom and loft off the end of the back ell(was this once the woodshed?) while cooking and dining in the little cottage out back beyond the barn called Goose Run Cottage just off the renovated beautiful hardware cashed and signed by a foundry-man in Portland, Maine. The bake oven and chimney were supported by a very long brick foundation with the cellar below indicating that it had once likely been a significant cooking fireplace at the current kitchen end of the foundation. The support for the large hearth was provided by a line of 3 thick likely water-sawed Hemlock planks, still sound and in perfect condition.
A similar construction in New Sharon, Maine home, that I had viewed for a possible masonry heater was very badly deteriorated and rotting from mold. The Bowdoinham home was on a little knoll of land and had no water in the basement. The old kitchen elle where the large brick oven stood, I was invited to look at the oven and foundation because Reeve and Hannah wanted to replace the oven with one of our brick masonry heaters along with a heated bench in the front (towards the new kitchen) and an unheated see through bench on the side already refloored with large slate tiles. This space to the right of the proposed heater would be the mudroom space where outdoor jackets could be hung on the wall and dirty boots and shoes. Water in the basement had clearly not been an issue. The Holman home (New Sharon) was built on a downhill slope running towards even steeper deep banks of the Sandy River, and water in that basement had always been a problem. When in constant use a home of this sort can stay drier because the heat produced from steady fires keeps the moisture and mold somewhat at bay. When a home of this sort stays closed up and vacant for a few years, everything in the basement begins to mold rather quickly.
In my own home some of the old floor beams have been sistered with newer dimensional floor joists, and each year I make sure after removing bags and plastic shield frost protecting hay bales from around my house to open up the cellar with screens in all the windows. These early homes were built without any vapor barriers in the floors or walls so they go through lots of changes through the seasons and must be allowed to breathe and dry out in the spring, summer, and fall.
In Bowdoinham, it was clear that we could retain and build on top of the over sized existing foundation and needed only to take down the chimney and oven to a depth of about 4 below the finished floor (a depth well above the hemlock planking), to give us a span to lay in our structural 3 insulation layer of calcium silicate (Skamol) board. We were doing one large fireplace, oven, set kettle restoration project in Skowhegan at the time, so I hired a fine, younger mason friend of mine to take down the chimney and oven in his weekend spare time. He got the chimney down and much of the oven, but left one oven wall and the floor for us to remove. When we arrived, I had already salvaged, cleaned up, and reused the beautiful oven loading and ash doors in my East Madison restoration project. Indoor brickwork of the early to mid 19th century is always laid up in a lime mortar so things come apart pretty easily with a brick hammer and chisel. Tougher spots yield easily to a Roto-hammer set in hammer mode.
Our workshop crew of Albie, Peter Skove, Armando Cruise, and Dan Paluska arrived and quickly set to work on protecting the wide pine floor with taped plastic and large drop clothes. A long porch outside the kitchen was cleared and set up as a wet saw zone and work station. We moved our tools indoors around the rooms perimeter, but kept all the castings, components, mortar, and unused staging elements on the porch.Brick and firebrick were on pallets outside and kept covered with tarps and brought in wheelbarrow loads of brick and firebrick as we needed them. A huge dumpster and a discarded brick pile sat outside just beyond the porch. Skamol board is very absorptive of water, so when we had the hearth removed to an approximate 4 depth, we laid down fitted dry Skamol for a test fit first, then prepared a wet mortar bed and dropped the fitted pieces into place with only 5 to 10 seconds allowed to level and adjust each piece. On top of the Skamol we laid in tacked down aluminum foil to create a moisture barrier. On top of the foil we laid a thin mortar bed, then laid the concrete board sheets quite level on the mortar bed. This brought us to the floor level for our brickwork. Next to the heater on one side were the cellar stairs, covered at the time with the plywood trapdoor. We realized that going down into the cellar would reveal the Skamol and concrete board layers so we cut back the Skamol and cement board to a depth of 4 and Peter laid in a row lock course of half bricks so that the aesthetic from the basement floor to the top of the heater would be all brick. The original hearth width was wider than we needed for the heater footprint by 8, but with Reeve and Hannah’s desire to have an unheated bench on the mudroom side, we decided to lay the base layer of brick the full width of the original brick foundation the heater basic veneer wall on that side then became 12 thick versus the standard 4 thick. There was not enough room to put in even a small lined heating channel. The bench on that side was to be a nominal 16 in depth plus a 1 overhang, so that 8 extra inches of wall gave us a mass able to accumulate and radiate some heat into the bench and also gave us a good solid zone to place and tie our supports for the cantilevered bench slab.
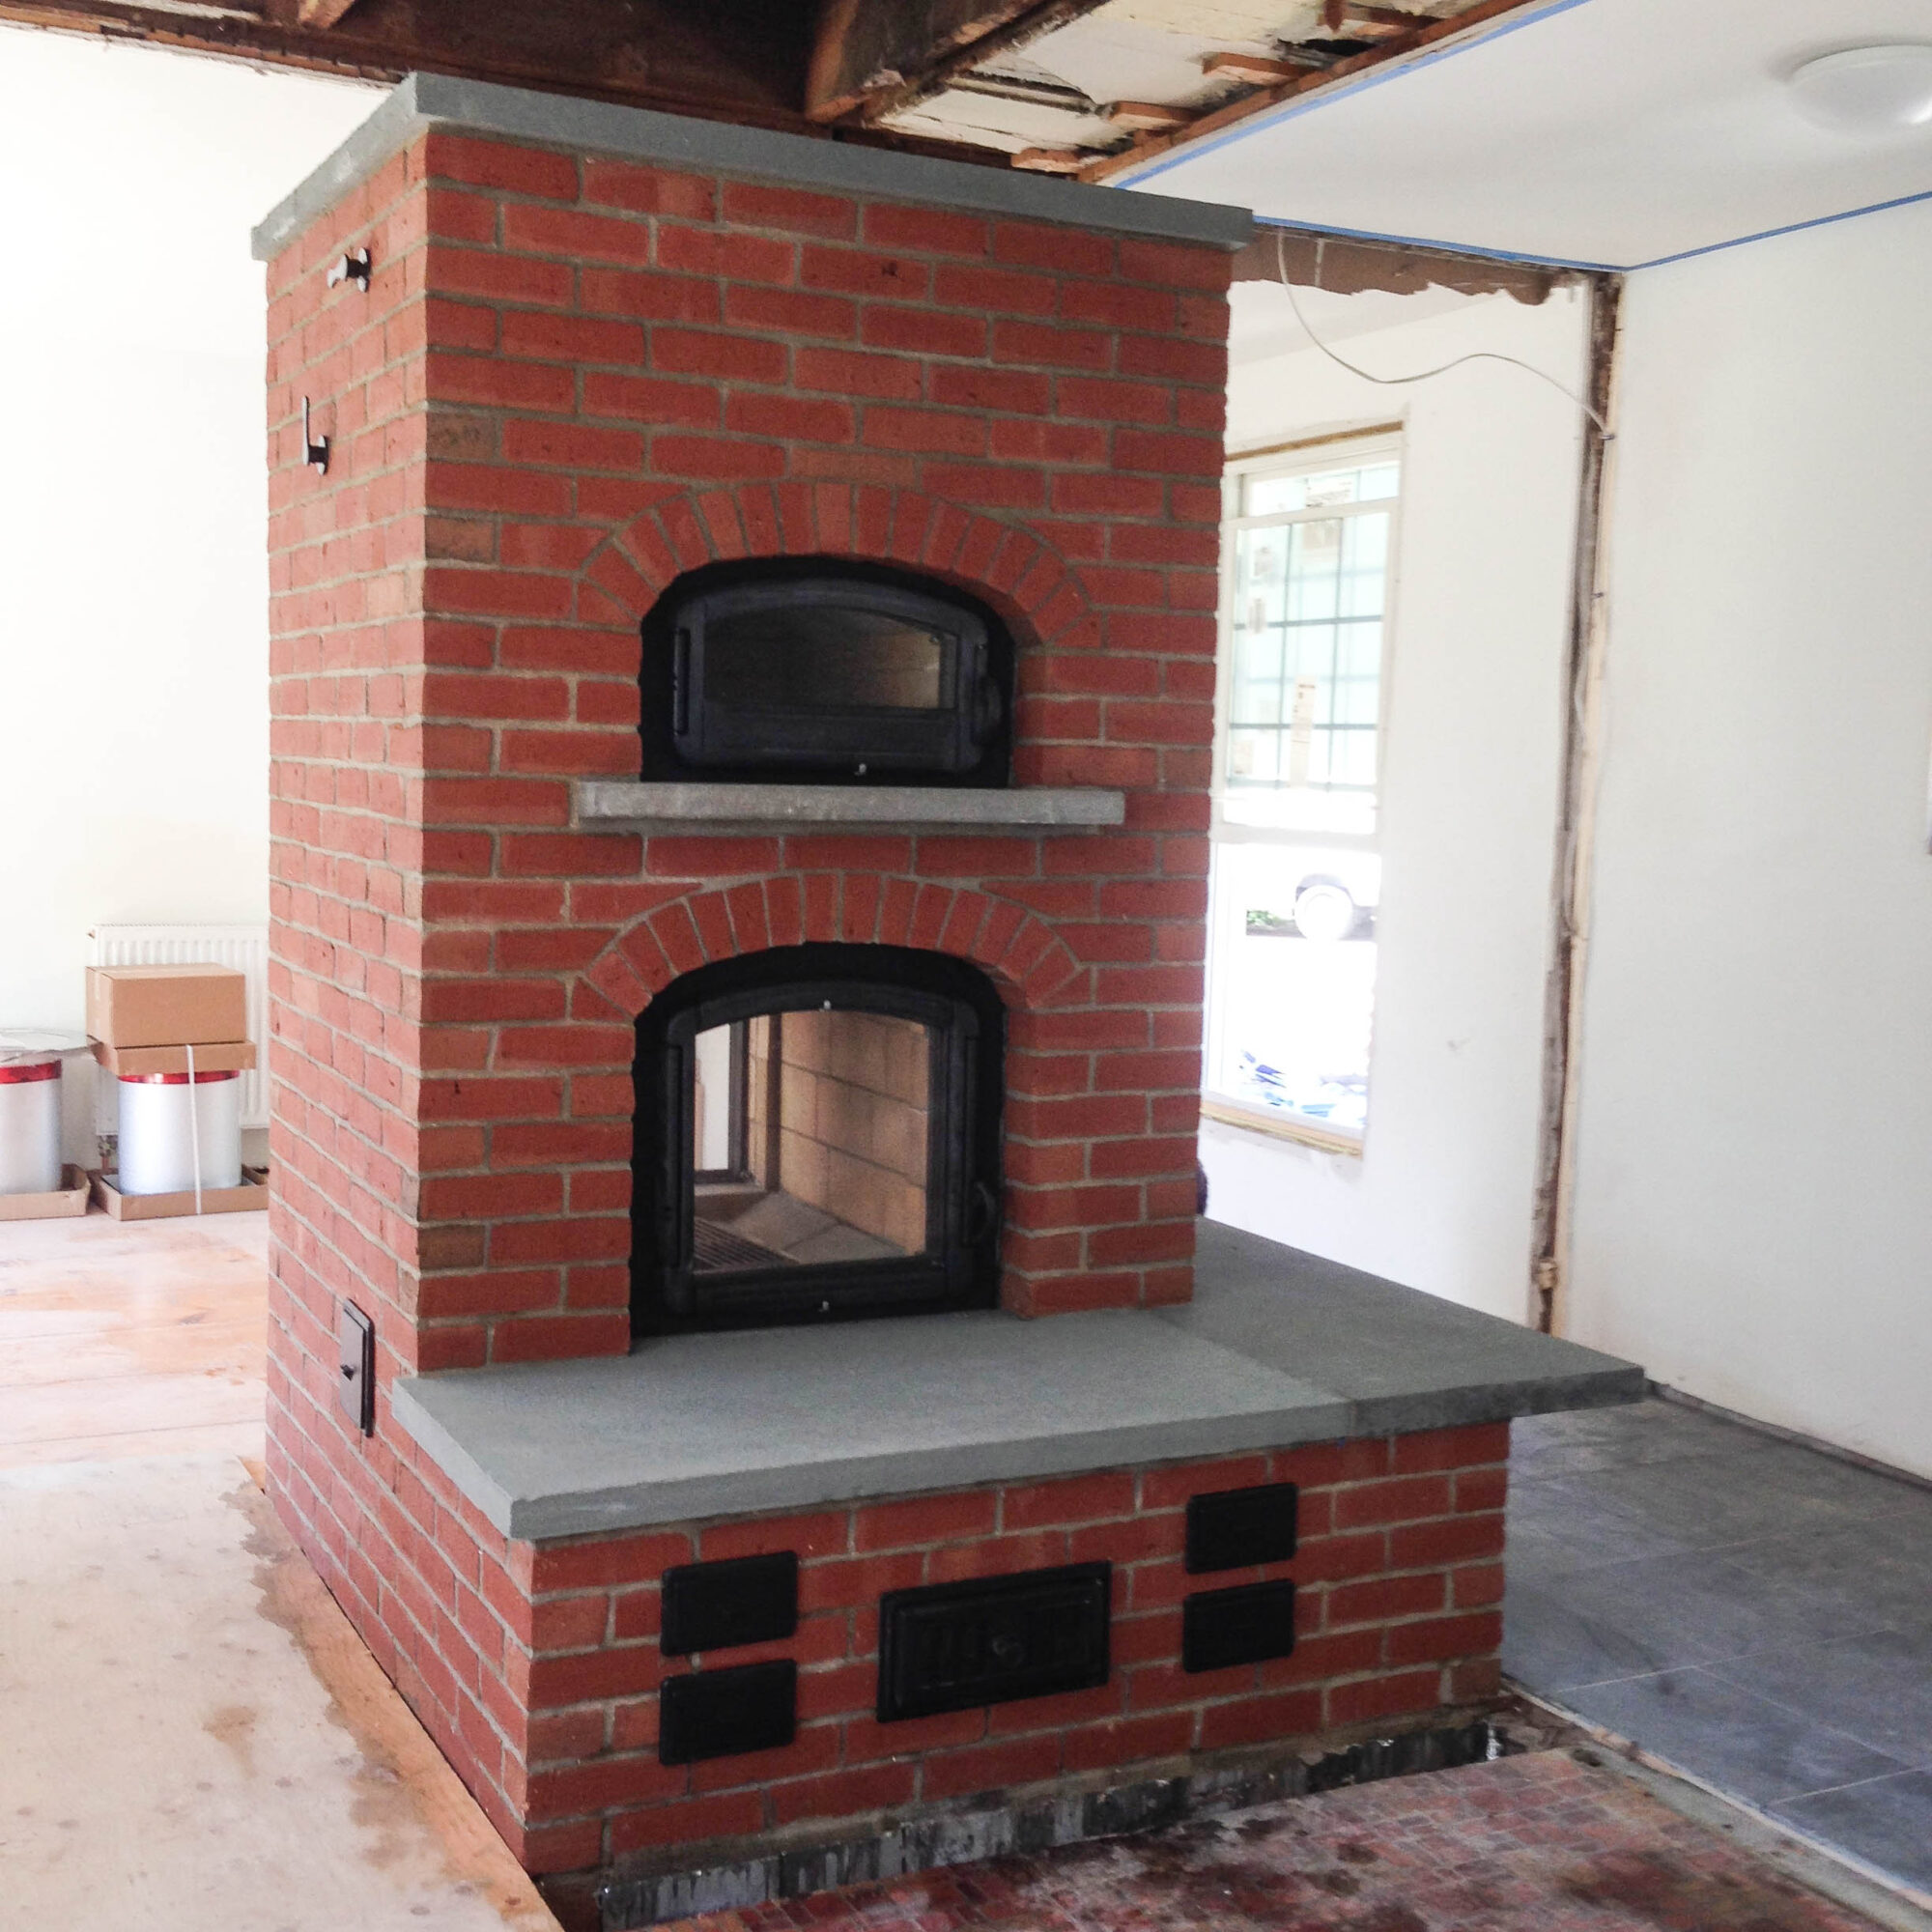
Reeve and Hannah wanted a clean and relatively simple look for the heater, and with the dark gray slate floor and dark gray kitchen sink in place, dark gray bluestone became the best aesthetic and economic choice for the bench, bench supports, the oven shelf, and the heater caps. After some back-and-forth discussion, Hannah and Reeve decided that the side of the heater where the oven face originally was, should have a second fire viewing door making the heater a see-through. This luxury would be appreciated when they and others dined at the planned table in the cozy baking oven. We took careful measurements of all of our brick layouts, caps, and heated and unheated bench sizes, and decided to purchase the blue stone and cut it to our templates in our shop, where we have sturdy work tables and a big wet nail saw. This project took a day and allowed some touring of the shop and local heater projects for the crew.
Back in Bowdoinham, Peter had already laid out the unheated bench wall with slots ready to receive the somewhat triangular bench support stone elements. We were able to slip them easily into place and shim them at their bottom leading edge until the mortar around the vertical joints set up. In general, I build six courses of veneer construction first and then follow up with core construction and heat exchange walls. After these three steps, I finish the veneer. My son Scott always does the core and heat exchange walls first. With a complicated top exit unit, a heated front bench, and an unheated side bench, it made more sense for us to follow Scott’s pattern of construction, so we laid out the core elements first, remembering that the hearth was over sized and we would need to do an off-center layout. A see-through unit also needs careful centering front to back so the core walls, veneer walls and doors on core walls have similar spacing on each face. We useda light flashed Morin water struck brick which they called a transition brick because as they change temperatures in the kiln to create lighter or darker flashes on the brick, there are always a few thousand bricks that are a little lighter or show less flash than their architectural standard. The bricks were handsome, simple and fine.
A top exit heater uses more firebrick than a standard heater because of the central divider in the heat exchange channels. We decided to build the complex front heated bench channels out of firebrick. Therefore the firebrick count jumped from 285 to over 350 in this case. The top exit unit has a longer run than a downdraft exit unit and more heat exchange mass. It can be argued that top exit units are a more efficient design than the base exit of unit because the heated gases stay with in the system longer and touch more surface area. The challenge of combining a top exit design with a front only heated bench is figuring out a continuous path for the smoke to travel from the firebox to the oven to the top of the heater, then to the bottom of the heater, into and through the bench, then out of the bench back into the heater and up through the heater and out. We have done this a few times now. We exit out of the rear of the oven away from the heated front bench. We channel the smoke down to the rear corners of the heater to the base. The center partition wall on each side keeps the downdraft rear channels separate from the updraft front channels, but if we move down the rear how do we get the smoke into the bench without losing it up the front channel? The solution is a horizontal partition inserted on both sides about 5-6 off the floor under the front channel and into the bench. The material has to be sturdy but not too thick. For this purpose, we need some strong, thin refractory slabs. I drove to Portland Pottery Supply and bought all of their flat kiln shelf 1 thick stock, just enough to cut into the pieces we needed for our partitions. We very carefully cut the shelves into the sizes we needed and laid up our firebrick support walls. The passage into the heated bench is low, but it returns to the heater higher up. Each passage has to be accessible for cleaning. We also have to leave room for the ash pan chamber at the center. All of this work is hidden, but it may be the most complex and time-consuming work in the project.
We laid out the veneer walls around the bench with all the partition clean out spaced, mortared, and wired in place, and then laid up the bench core and partitions to correspond with the outside access ports. Peter did most of this careful door setting of the interior work. Armando and Dan did much of the interior firebrick setting because hands learn with greater memory than the mind. I did the cutting, designing, and directing of the workflow at this level.
When finished with the bench core we had all of our layers in and clean outs properly aligned and a gasket layer on top of on top made of 1/4 mineral wool, all laid just below the top of the sixth course of brick, where the blue stone bench slabs would be set. Armando Cruz was trained as an engineer and worked as a Miami-based builder, is building his dream house in the North Carolina mountains, south of Asheville. He is putting two masonry heaters in his home and has previously worked with me on a heater project in Potsdam, New York. The Bowdoinham project gave him a chance to refresh his heater building skills before he builds his own two heaters. With his precise analysis, layout, and design skills, I assigned all of the tough framing and templating tasks to him.
At the top of the heater core, a top exit unit heater requires that we extend the center partition over the oven and incorporate a space for a shortened bypass channel within this flared partition, that starts at the width of a firebrick on edge, and expands to the width of the shortened bypass channel of about 8. We drill and set tapcon screws as anchors in the top of the oven refractory arch where we intend to pour the extended partition elements. We usually pour these elements within fairly primitive and hurriedly carved Styrofoam forms. Armando however, has extensive concrete framing and pouring skills so he carefully designed a set of reusable curved plywood forms that fitted perfectly over the bake oven arch, and defined the shape of the partitions we wanted. He then poured and leveled the two sides of the partition pours. These partition elements set up overnight and each could be cleaned up the following day. The bypass channel rod passes through the poured portion on one side so it is carefully wrapped in gasket and tape and leveled and shimmed so that the handle has some free play but will also be able to rotate in the veneer brickwork in a tight circle within the powder coated black escutcheon which is bonded to the brickwork.
The cap slabs for a top exit heater have to be calculated to include a properly positioned round hole in the center slab to receive the locomotive quality top exit damper assembly that we use. After carefully sighting up through the ceiling with a laser level to the roof peak and noting the available space in the heater top in the chamber forward (towards the kitchen) of the bypass, we formed up the three slabs using duct tape lined two by fours screwed down to a plastic wrapped piece of plywood. We made the center slab a bit wider than the two side slabs in order to give the center slab more mass and strength around the top exit channel and damper hole. We used the top exit damper itself as a form, by wrapping it in a layer of cardboard and tape. We turn it upside down as our removable plug for the top exit hole. Armando measured and secured the wrapped damper in the correct position and then we poured the slabs.
After the overnight cure, I released the forms and cleaned up the edges of the elements with a file, grinding stone, and diamond grinder as necessary and stood the three slabs side-by-side on edge to help them continue their cure. The now clean and form free arch top partition pour, we then lifted the slabs into place with a long two by four carrying pole sleeved through the doubled up wire bale handles. Head joints are double mortared with Sairset when all three slabs were set we checked the centered hole alignment again and made slight adjustments in position with a weighted nylon mallet. Once the slabs were up we covered their vertical faces with two layers of wetted mineral wool bonded with Sairset. The bench slabs cut in our shop, were long and heavy. We mounted the unheated side bench slab first. It gave us the ability to grab both ends and carefully level it with mortar and shims from end to end and front to back. The side bench slab was not as deep as the front slab. The front slab also bridged over all of our fancy kiln shelf runs. It had good support on the left side and front face and only limited points of support along the rear.
Armando provided an orange nylon strap from his van and with four of us lifting(one person above in the old chimney whole holding the tension strap), we were able to set the front bench slab into place and successfully level it. The head joint seam between the two stones we bonded with a spaced double bead of high-temperature silicone applied far enough below the edge that it does not ooze out the top. Once set up, we can cut off any surplus that appears and fill the cracks with a tiny amount of black dyed mortar. With the benches on, we then laid down plywood and cardboard protection on the stone, and continued with the veneer. With two loading door openings and one oven door opening, I was kept busy templating and cutting out about 16 to 18 bricks per arch using a method of laying out the door frame on a large piece of cardboard with brick coursing marked top to bottom on the cardboard. Once we decided on the spacing around the frame, I laid short bricks out all around the line of the bottom edge of the arch. With an all brick construction and no Keystone, bricks were equally spaced to meet on the center line above the door. Brick width spacing marks on the template give a starting point to scribe lines down to a common point on the center line of the cardboard just below the bottom of the door frame. Each brick shape is defined by Sharpie marker and I number and cut out each cardboard brick shape and transfer the shapes to brick faces and proceed to cut each arch brick on three sides, retaining an uncut face for the bottom edge of the arch. Each brick is trimmed so that it fits in the hole left by the numbered cardboard pieces. In the days before the arch construction, I had carefully cut holes into three galvanized paint receptive metal sheets just slightly larger than the three door frames. Each sheet is painted with multiple layers of high temperature black paint. I drilled a small hole at the top of each sheet so that I could hang them to dry with a wire hanger. That same hole will be the mounting hole for a tapcon screw to hold the metal in place over its corresponding opening in the firebrick work.
Once mounted, we covered the black metal with plastic secured by a bare minimum of blue masking tape so that the plastic can be easily removed when the brick work around and over it is done. Armando set to work building a perfect form out of twin screwed together sheets of 2 blue foam styrofoam. He gave special attention to creating a uniform smooth curve using a handsaw and bricks as a sander to create the perfect shape Peter laid up each side of the firebox veneer to the arch spring point, and then I came in with very fragile cardboard stencil, centered and pinned it in its correct position, aligning all of the course lines with the lines we had already laid out on the mineral wool gasketed core faces. I spray painted through the stencil to leave the exact shape and position to lay the bricks we’ve already cut. The arch form was slipped in the position and wedged securely on each side so that it did not shift. I carefully and quickly laid in the arches then made sure the faces were in a straight line with the surrounding brickwork. Piecing in above the arch brick requires making little brick sized cardboard pieces and sliding them into the brickwork void and marking where they need to be cut. Trying to get a tight fitting shaped brick design, and layout. Care and cutting always takes much more time than the actual laying of the arch or surrounding brick. A beautifully designed arch creates peace and harmony for the whole and is always a pleasure to look at consciously or unconsciously.
After an overnight or several hours, Armandos forms were easily removed and the hidden joints tooled and filled as necessary. As the brickwork moved up even further, it was possible to grind and sand smooth the few lower edges of the arch not in best alignment with the whole of the arch. The oven shelf stone was calculated to fit into the brickwork in such a way to avoid any stacked joints. The depth of the shelf, I generally cut at about 7-8 so there is a modest shelf to support a peel or a pan, but nothing so deep to create a hazard for someone trying to load the firebox below. We completed the brick veneer and oven arch and carefully worked bricks around the bypass and top exit damper handles. In preparation for setting the slabs, I took careful measurements of the top exit damper location which we had set on a single sheet of 1/4 mineral wool. The collar of the top exit dampers resting on the wool creates a nice gasketed fit, but still leaves some room within the cast refractory for the metal to expand and contract. From the measures of the veneer layout and the in-place top exit damper I templated the locations of the damper circle on the two center stones and proceeded to very slowly and carefully cut out the two half circles with a flat face diamond grinder. With bench and staging planks to assist and a slight overhang to grip, we were able to press lift the slabs into place on a bed of mortar, and bond the head joints with a spaced hidden double bead of high-temperature silicone. Small chips off the thermal edge of the stone were repaired with a mix of epoxy and blue stone dust then carefully distressed after they set up to come to an approximate match with the adjacent stone.
With plastic and pine shavings on the floor we did an acid wash the following day and started cleanup, organizing and repacking tools. I had three doors to mount using a new system developed by Scott. He welds a 1/4 rod to a 1 long of 1/4 threaded coupling as a T-Shape. We hold the doors in place inside the painted metal frames and note where we need to drill holes in the side walls of the firebrick openings to receive the round rod we make the holes a little sloppy and then carefully thread 1/4 x 4 stainless bolt through the corner holes already in the face of the door frame, and catch the unions and then tighten all the bolts, gasketing on the back of the far door frame pulls in snugly against the black painted sheet-metal surround and gasketed core friend core face. During firebox construction I’ve taken special pains to make sure that there’s adequate material for the securing bolts to grab and hold onto. This sometimes requires that we cut dog leg shapes to tie the mounting corners back into the side walls of the firebox. We completed the project and about 90 hours with everything clean and ship-shape headed back to finish our Skowhegan restoration project.
