
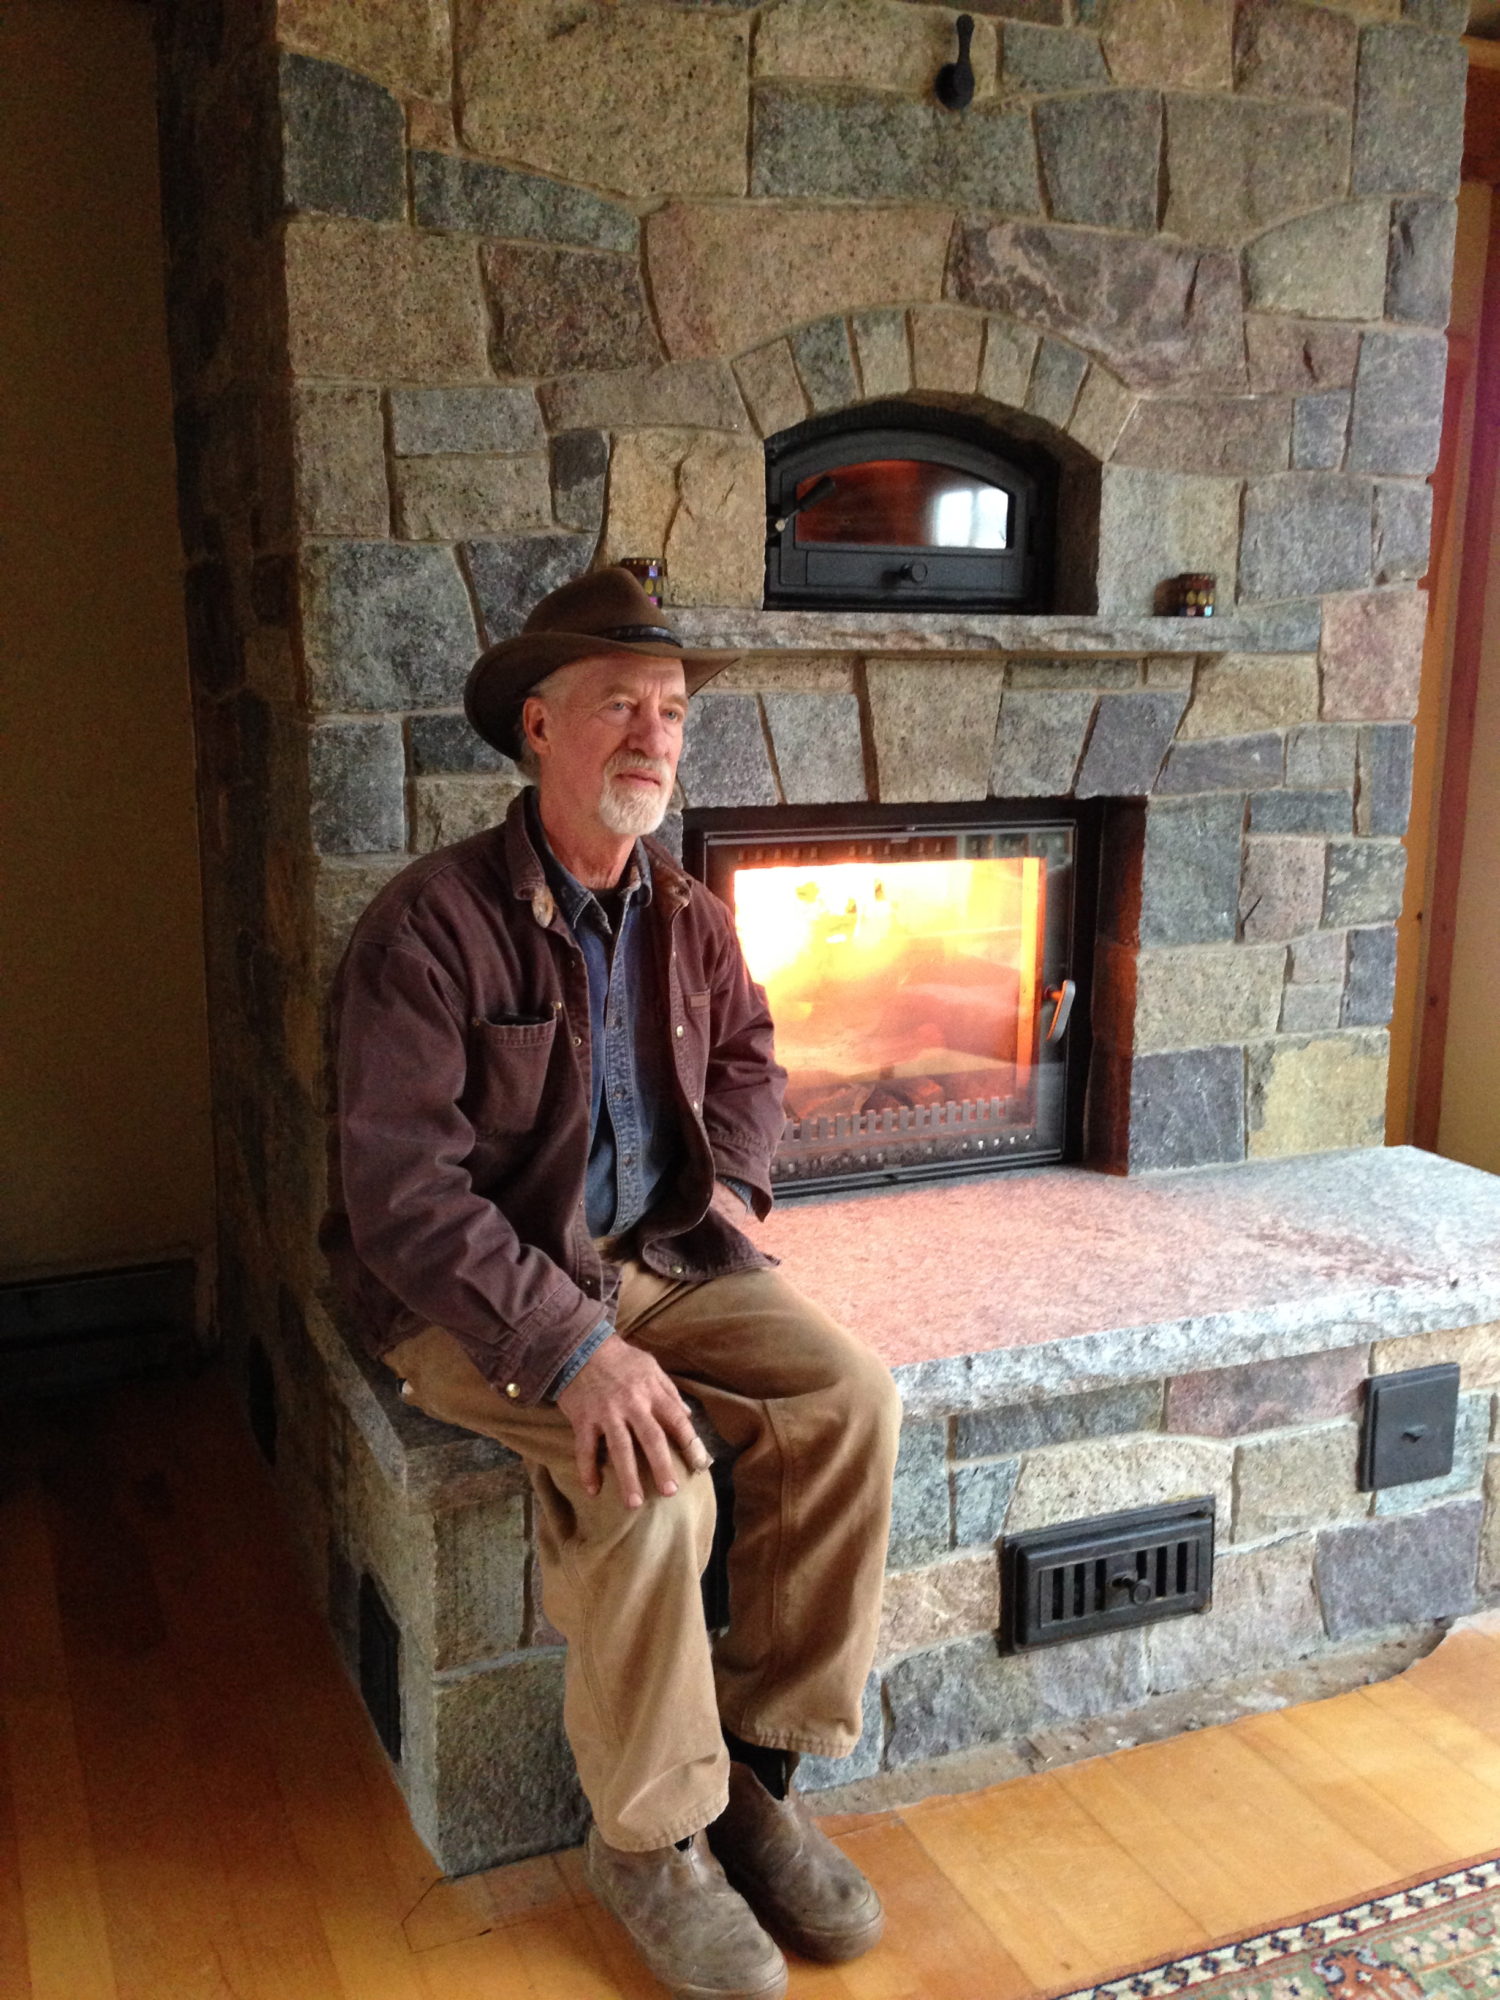
Converting a poorly built brick Heatilator fireplace into a high efficiency double downdraft stone veneer masonry heater with fire view, bake oven and heated bench in Lanesboro, MA. (2014)
The timber frame house and ten acres of open land on a ridge just outside of Pittsfield, Massachusetts offered enough land for Jim and Annie Schultz to start their organic Red Shirt Farm and to make an easy commute to their professional jobs in Pittsfield (Jim runs the technology program for the public school system and Annie is a nurse). The house came with a cathedral ceiling and a huge used-brick Heatilator fireplace that had been retrofitted with a blower vented wood burning stove insert. Many years ago, I had built a cooker/heater complex in brick in the 18th century home of Annie’s parents in Williamstown, Massachusetts. I had met Annie and Jim who were then living in the hired man’s house on the CSA farm. They had dreamed of one day having a masonry heater of their own and wondered if they could convert the unattractive Heatilator fireplace to an efficient attractive masonry heater. Jim contacted me with their inquiry; after several phone calls and emails with photos and scaled sketches, I suggested that one of our team do a site visit to confirm that a conversion was possible. We decided that it was, by extending the existing foundation to accommodate room for a heated bench in front of the heater. I felt it could be done in a couple of days to run up a block wall extension and to pour a new capping slab of reinforced concrete to support the heated bench. Jim and Annie wanted to have much of the brick covered with stone or changed out for stone. We weren’t sure of what stone we would use or how we would make the covering/change out but had confidence that it could be done.
After getting Jim and Annies go ahead, I counseled them to prepare the space by getting plastic and wide blue masking tape for a layer of protection for the rest of the house and enough sheets of ¼ plywood to cover the entire floor from the demolition of the existing fireplaces’ face and guts. When our crew (Ryan Neidlhold, Peter Skove and I) arrived, we laid down wall to wall plastic, covered all the plastic with the plywood and taped all the seams with sturdy black Gorilla tape. I brought my scaled footprint drawing of the mass and we trimmed back the finish floor to match the drawing so we could tape the edges from the outset and prevent dust/grit getting under them during the project. We set up Zipwall poles to enclose a large square work space around the fireplace and also hung boards and plastic above our heads at the second floor level on the beams and balcony there. All the edges were stapled or double taped shut with an overlapping entry way of plastic at one side of the room and a big double glass slider door on the other side of the room. Knowing the mess we were going to make, I brought a large dust evacuation fan from our shop and two huge slinky vent hoses, one sucking the air from inside the space and one snaked out through the door to dump the dust outside. Despite the enormity of the project, the plastic room, floor protection and the big exhaust fan allowed us to work, live, cook and eat in the house during the project. We kept our tool boxes and wet diamond in the garage.
After the upstairs was prepped we moved our attention to the basement where the foundation work needed to proceed. Peter was in charge of the block work as Ryan and I finished up the projects we were working on. Peter brought in all the block, mixed his own mortar, and started the foundation. Insulation at the ceiling around the existing fireplace was pulled out and to our great surprise we realized that there was something very wrong with how the original fireplace had been built. The first course of brickwork on the fireplace was a header course with bricks ends laid eight inches deep and cantilevered out over the foundation so that they were resting on the floor joist system all the way around the heater. This was both a violation of fire safety code and a questionable way to support the weight of an entire fireplace veneer and very tall chimney. This structural and safety problem forced us to adjust our plans and required the help of a very skilled local carpenter who came in and cut back the existing framing all the way around and reframed the floor to our specs with a proper clearance allowed. I was very nervous about whether the brickwork would remain stable with much of its support cut away but the cantilevered first course was weighted down on its inside half by many tons of masonry, so the mass weight and finished monolithic nature of the mass allowed us to proceed without anything cracking apart or falling down. We discovered upstairs that the closet bedroom wall behind the heater was also in code violation for safety clearances, so we had to cut it out and remove/pull back to give us the required four inches of clearance that we needed for our masonry heater. Our carpenter spent many more dusty tight-quarter hours making all the adjustments necessary for the back wall clearances to work. It became very clear that the conversion of an existing fireplace into a masonry heater is a very challenging process, no matter how possible it looks at the outset.
With everything finally reframed, we realized that the foundation was going to have to have a whole new wall around the original undersized foundation. I rejoined the job as Peter approached the ceiling with the new block work. As we started forming the new reinforced concrete heated bench pour, we did a little digging in the original hearth extension and discovered that there was no steel reinforcement in the original capping slab and no aggregate in the concrete mix. This means the mason had chosen to simply mix Portland Cement with sand to make up his concrete pour. Peter and I wound up drilling holes into the face of the original foundation beneath the hearth slab and fitted short lengths of rebar into the holes. We made a six inch grid of rebar under the existing slab extension and laid another grid, extended further above the hearth extension, and laid down concrete board as an underlayment and support for our new pour. We vibrated the concrete to slide under the existing slab, filled in and vibrated the concrete poured into the form above the slab. At the rear of the existing foundation we laid up a four inch solid concrete block wall, just missing the plumbing of the new externally vented hot water boiler, and with this rear addition were finally able to give support to the existing mass above/all around independent of the floor joists. Satisfied with a new properly built foundation and slab, we were now ready to move to the next floor above.
Upstairs we decided to stabilize the single wythe brick veneer in two fashions as we prepared to take off the entire face of the fireplace, a bit around the corner and proceed to gut the core and the three original flues to a height of about eight feet. On either side of the fireplace were house walls about four or five feet away. We laid up ¾ plywood sheets against the side wall faces of the fireplace and put horizontal and diagonal braces from the walls to the fireplace, so there would be no chance of the walls buckling out as we worked on the mass. On the face of the fireplace at the eight foot level, I took a very large dry diamond saw with a blade capable of cutting over four inches deep and with proper protection proceeded to cut a mortar line across the entire face of the fireplace and then inserted a heavy six foot long angle iron into the slot that I had created. This would give support to the brick work rising nearly thirty feet above the cut. We also were concerned about supporting and capturing the three lines of flue tiles in the fireplace core before we began removing materials, so we went to the now open closet on the rear side of the heater and drilled three sets of paired holes opposite each flue tile and inserted short lengths of rebar through the block work and flue tiles so that everything above the rods could not fall. We only needed to preserve, for future use, the 12 x 12 flue tile in the center that had been the original fireplace flue. The boiler flue in the basement had been disconnected some time ago when Jim and Annie switched to a high tech externally vented gas or propane boiler. The third flue in the basement, for a back up wood stove, had also been abandoned years ago so that would be no loss when we removed the first floor section of that flue tile.
In place of the original fireplace core, our measures showed us that we had room for a double down draft top exit heater and with my drawings in hand we commenced our demolition work. First we pulled out the heavy steel and cast iron wood stove insert and dollied it out to the garage. Next we sweated and struggled but finally tore free the very large steel shell Heatilator Fireplace insert and moved it outside. The best tool for the demo work was a heavy Hilti (a mini jack) hammer that Ryan brought. With lots of noise, dust and debris we carried countless buckets of the heavy masonry debris out to Jim’s small, sturdy dump trailer. Whenever we were doing any demo work the big exhaust fan ran on high. Once the dump trailer was full, we’d drive it to a large construction firm that recycled bricks, concrete and asphalt by storing them in separate piles and grinding them up for aggregate uses. We moved four or five 3,000-4,000 pound loads of debris there. On the second trip I volunteered to take the trailer while Peter and Ryan continued working. I’d seen Ryan operate the hydraulic controls for the dump body on our first trip so I was sure I could handle it. It was raining heavily when I arrived at the twenty foot tall brick and block debris pile, a huge puddle had formed in front of the pile several inches deep. I backed the trailer up close to the edge of the pile and went to the rear of the trailer to pull out the three safety clips (which secured the steel pins that held the dump gate to the dump body). I carefully placed the safety clips on the fender, opened up the control box at the front of the trailer and proceeded to raise the dump body as high as it could go before getting stuck at the edge of the debris pile. I climbed back into my truck, inched forward three feet or so and raised the dump body the rest of the way up dumping out all the debris. I let the body gently down and scooted around to reclaim the safety clips from the fender, realizing then that the fenders were attached to the body. I had dumped the stainless pins and safety clips into the big puddle, now buried under debris. Not to be deterred by my ignorance and mistake, I got down on my knees and started dragging my fingers through the rubble in the puddle where the pins would have dropped. After many minutes of fruitless, abrasive bare handed searching, I finally found one and then all of the pins but no clips. With some tie wire I was able to secure the tail gate and did a slight detour to Home Depot on my way back (to purchase new clips). The dump gate was restored to its original working condition.
Before actually starting on the core construction we had spent close to two weeks rebuilding the basement foundation, prepping the upstairs, stabilizing the veneer and gutting the old fireplace core. Any whole bricks we were able to salvage we set aside outdoors in neat rows, knowing that we would need them later to close in the brick work beneath any thin stone veneer/above the veneer. While working on the foundation and demo work we came up with a consensus on the veneer choice of stone we were going for and the look of the stone when it was laid. Annie and Jim took trips to local masonry yards, but it was the stone from the Champlain Valley Adirondack Stone folks (Ryan brought samples of) that became the choice for stone. Dust covered, it looked somewhat grayish, but when washed and cleaned, it showed a remarkable range of colors including black, pink, darker pink and brown etc. Ryan assured Jim and Annie that the colors would pop when finished. While I worked on some in house task, Ryan and Peter travelled early one morning to the quarry in Ryan’s new, slick dump truck and brought back enough thin stone flats and corners to do the whole job. We unloaded all the stone piece by piece and spread it around on lots of horizontal surfaces so we could see as many pieces as possible for our future stone setting choices.
With the shell of the brick veneer already up on three sides, we decided to build the core and double downdraft heat exchangers all at the same time. To smooth out the rough interior of the veneer walls and to take up a little bit of extra room, we attached and back filled sheets of ½ thick concrete board to the walls to create the desired 56 interior side to side spacing we needed. Our drawings showed us where our channels were to go and where we needed clean out port holes cut so we located and cut these holes in the original brick veneer wall with a diamond grinder and hammer drill. With the holes and concrete board slush filled liners in place, we pasted up a ¼ layer of wetted and refractory mortared mineral wool sheeting on all the inside surfaces. This would be our expansion joint between the heat exchange walls and the veneer walls. The core was straight forward to build but the down draft and updraft channels (four on each side) presented a bit of a challenge, because with a heated bench running across the front of the heater and with a top exit for the chimney, I had to figure out a way to run the hot gases up the center of the core, split the gases at the top and send them down the rear corners, run under the front corners to the bench, enter the bench at a low level and then do a horizontal run towards the center from each side and then turn back rising to a second level of channels and return to the heater and enter the updraft channels in each corner and land in the chamber underneath the top exit damper and flue. We still wanted to have a direct draft by-pass exit to the top exit for starting and break-in fire lighting purposes, so we needed a by-pass channel at the top as well as a means for entering the rear channels first and a way of slipping under the front channels to get to the bench to travel through the bench and back into the front channels. The oven elements are usually mounted with the exhaust slot at the front of the oven but by putting the slot at the rear of the oven we were able to be at the rear of the heater for our downdraft run through four channels. We carefully measured from a story pole where the by-pass channel would exit the veneer and drilled a hole through the brick veneer to receive the handle of the by-pass channel. In a previous smaller heater project in Maine, I had faced the challenge, with a top exit chimney and a front only heated bench, of figuring out a way to get a continuous flow from firebox to chimney, down channels, through the bench, and back up channels and out. Clay flue tiles would not be structurally strong enough to handle the weight of the firebrick partition column above it or the strong heat to serve as a horizontal partition for the hot gases to pass below the front channels from the rear channels to the bench. Cast refractory slabs as a horizontal partition in the heater would work but in the bench would add too much height for two layers of channels to fit in the 19-20 projected bench height. When we did our first top exit front bench unit, I realized that the inch thick, very high temperature kiln shelves might be a good choice, so we found a source of these tiles barely used and placed them in the unit as the horizontal partition below the front channel as well as the horizontal partitions in the double stacked channels of the bench. We had enough room calculated to stack two layers of the kiln shelves and still had an adequate cross section of channel to carry the exhaust gases without any constriction in the system. I asked Annie if she had any potter friends who might have kiln shelves in good condition. She asked around and found a potter friend with an extra ten (1′ x 2′?) shelves. We bought them all and had just enough to do the job. Within the bench we made the gasketed heat exchange liner walls out of firebrick on edge, laid in refractory mortar. At the top of the bench firebrick and kiln shelf assembly we left room for a layer of ¼ mineral wool to go over the top of all the guts of the heated bench.
The double downdraft design with a top exit calls for a center partition of firebrick down both sides. The center partitions are tied to the outer wall of the heat exchanger with mortar on several courses and then is woven into the outer wall every few courses. The center partitions, like the rest of the heat exchange walls, are gasketed against the core, creating room for movement and expansion between the core and the heat exchange channels. At the top of the core, above the bake oven arch, the center partition has to be continued and expanded to accommodate the approximate eight inch length of the shortened top exit by-pass channel. We drilled six holes into the top of the oven arch elements and secured six ¼ x 2 ½ tapcon screws buried half way into these holes to act as anchors for the cast refractory pour that we would do on both sides of the by-pass channel, which we placed in its correct position, gasketed with mineral wool and aluminum foil to act as one part of the form for the pour. Carefully cut 2 pieces of styrofoam shaped to the curvature of the oven arch were cut to match cardboard templates and then wedged carefully into position to provide a leak proof form to pour the partition extensions in. The handle for the by-pass channel was fixed to the stubs coming out of the by-pass channel with a permanent roll pin and the rod was extended through the brick veneer with enough length left on it to exceed the stone veneer which we would eventually add. The rod was also gasketed throughout its length and wrapped with foil so that it could rotate smoothly and freely within the finished cast-in-place center partition extension pours.
Before we neared the top of the core construction we had to remove the 6 flexible stainless steel pipe which had been run down through the 12 x 12 flue tile for the wood stove retrofit. Our heater would need an 8 flexible stainless liner so we had to both pull the old liner and install the new liner before completing the chimney hook up from the core. The Schultz roof was a steep 12/12 pitch and the chimney was far enough away from the peak that it rose from the roof eight feet or more to clear the roof ridge by 2 to 3 ft. Getting to the top of the chimney to pull the first liner and install a second larger liner seemed like a risky and expensive proposition. We almost went with a local equipment rental that could be delivered with a telescoping bucket for one man for $800.00/day. Ryan kept looking at it, finally deciding that by bringing his own pipe staging, a couple of his crew members and a ladder leaned between the back of the chimney and the roof that he could do the job for less without the rental equipment. I was away for this acrobatic work, but it was done cleanly and efficiently without a hitch and the new liner was sealed at the top with a surplus hanging out the bottom of the fireplace flue when I returned to the job.
We measured the combined width and depth of the core and heat exchanger and I cut two by fours to build a form just an inch under the length and width totals for the three cap slab pieces in the form. Each two by four was taped with duct tape on any face that would see the wet cast refractory concrete so that we would not lose moisture and cause deterioration along the edges of the pour. We used the MWH shop built locomotive quality counterbalanced and spring loaded top exit damper as our form for the exit hole in the slightly wider center section of the capping slabs. We turned the damper channel upside down where the length of the channel is over four inches before its flange collar and wrapped that section with cardboard and duct tape to give room for releasing the damper channel from the pour and for later gasketing. The capping slabs are 3.5 inches thick. Over the years, I have taken apart a few soapstone heaters with capping slabs of 60mm soapstone and I have never found one in which the capping slabs had not cracked. In contrast, the few times I have had to inspect the top of a heater with a 3.5 thick cast refractory slab, I have never found one with cracks. The cast slabs set up pretty well in a twenty four hour period if we use warm water and line the form with plastic over plywood and lay styrofoam panels over the wet ours. We cast them one day, released them on the next day, ground off surplus on the edges and turned them on edge to thoroughly dry the next day before setting them in place using the twisted tie wire anchors and double wire loops attached to these little t shaped anchors which we had set into each corner of each slab. Each slab is double buttered on the adjoining vertical layers with refractory mortar and the three slab assembly is set on a double layer of mineral wool gasketing set on top of the carefully leveled core and heat exchange channels. With the cured slabs lifted in place through the double wire slings using a long two by four carrying pole and brute strength, we then were able to gasket and fit the top exit damper in place and add its own rod with a roll pin to carry out through a carefully aligned hole in the brick veneer. Even with all of our fussing and measuring we knew that the top front centered exit was going to be a bit forward of the 8 flexible pipe and that we were going to have to struggle to get it to do an s curve fit on our damper. We also knew that it did not make sense to fit the flex pipe to the top exit damper channel without providing some kind of clean out for the long chimney liner run. One supplier of custom stainless fittings was unable to offer us a delivery before several days would pass but Ryan had worked before with National Chimney Supply in Vermont and a very friendly and competent tech-smart man at National was able to take my over-the-phone design description and measures and fabricate a custom welded t extension of our top exit channel with a 6 plug on it to give us a top face access point to the chimney liner run. Once this fitting arrived, we were able with a lot of struggle and pulling and nibbling of the original flue tile face, with Ryan perched on top of the heater core, to drill and secure the all the pieces with stainless sheet metal screws.
We were then free to pursue the stone veneer. Lining of the single wall veneer with a slush filled layer of concrete board and the construction of the core and heat exchanger had made the brick veneer wall of the original brick fireplace both thicker and more stable, so we were able to comfortably remove the exterior braces on the side walls. Ryan and I left for a weekend in Maine and Vermont and Peter stayed on to start the veneer and to mount the little soot doors and clean outs in the veneer. With the thin stone we decided to buy an additive to the mortar that would make the mortar stickier and stronger. When Ryan, and I got back, the veneer was underway on both sides and the front with all the little doors perfectly in place. Now began the dance of blending three subtly different styles of stone laying and also paying attention to the random mix of large and smaller stones and avoidance of repeated horizontal lines that Jim and Annie were shooting for. Peter took over the left side and Ryan took over the right side and I worked on the front, working on corner (L shaped cuts) rocks both on the outside edges of the front face and on the framing of the door opening as well. I cut out and painted the black sheet metal surround to go behind the big fireplace door frame and centered it and mounted it in place with a single tap con screw above the door opening. Covered in plastic, it was then possible to build the stone veneer and cover the edges of the frame. We left a little over three inches from the door frame location to the stone veneer so that the door could open freely and hands and knuckles not get scraped on the stone when opening and closing the door.
We had the thin stone in hand but no bench or oven shelf stone cut and supplied. Ryan brought a thicker sample of the Adirondack stone which Jim and Annie liked and he quickly placed an order from his favorite quarry for capping and trim slabs for the top of the heater and for the oven shelf and for the bench capping slab. These same folks who had provided the thin stone pulled a large quarry block out and started slabbing it to our needs but found a crack in the block and hard to start over. Not wishing to slow us down, we settled for just the oven shelf stone and waited on the rest. With the oven shelf stone in hand, we were able to continue with the veneer work without delay and I was able to template the jack arch pieces in cardboard that would go over the main firebox door and design and template in cardboard the true arch pieces and keystone that would go over the arched oven door with its own black painted sheet metal surround. With this technique I was able to make very accurate templates and an over all stencil for each arch and then cut stone to match the numbered template pieces. When all the pieces were cut and careful fitted to the stencil on a broad flat plank and saw horse surface, we then moved the stencil over to the heater and held it accurately in place and spray painted through the stencil all the shapes on to the thin mineral wool sheet layer fixed to the core. Simple forms were cut out from double layers of two inch styrofoam and taped, screwed together and wedged in place (using wooden clothes pin halves and black plastic shims), first at the large door opening, and then later above the oven shelf in the bake oven opening. With the forms in place and the stencil shapes painted on the face, we could be assured that the numbered cut stones would land where we wanted them to land.
I had the most fun at finding long colorful stones to cover the curvature above the oven arch stones and set them almost like wings over the arch. Near the end of the veneer, I had to leave the job with my camper trailer and two aging dogs to keep a commitment at home and Ryan and Peter carried on with the veneer. The long three inch thick bench stone was finally ready along with the capping and trim stones and Ryan picked it up and delivered it and with the help of another member of his crew, cut out the bench stone to accurately fit the recess depth of the door, and set the big stone with Peter. Peter and Ryan set the trim cap stones as well and pieced in brick to complete the veneer above the stone veneer where our open heart surgery had terminated. Peter also carefully selected and cut and set a thin stone near the top to fit over the chimney clean out to be secure but removable for an annual inspection by Jim and Annie. They washed the heater down with acid, rinsed it with water, took up the floor covers and took down the plastic walls and true to their word, the colors in the stone popped out crisp and clear. Ryan coached Jim and Annie on a break in burn and packed up the small quantity of tools left behind and headed out. I returned a couple of weeks later on my way South from Maine to New Jersey and stopped to see Jim and Annie and the heater. It was gorgeous and functioning beautifully. We did a burn together and I added a few tips and answered a few questions and took a number of photos and simply reveled in the transformation of the space into something both wonderful, functional and grand. Jim and Annie had their dream heater at last. My deepest thanks go to Jim and Annie for asking us to build this heater and for staying so supportive during all the unseen snags we ran into and solved, and to Ryan Neidhold and Peter Skove for their amazing talent and hard work on this project.
Albie Barden
