
Bob and Lynn Thurrell bought an old center chimney cape farmhouse and land in Pownal, Maine a generation ago. The house was a wreck when they got it and Bob worked feverishly to make it habitable for their first winter. They made it through with a wood stove and lots and lots of blankets, but the house took a long time to restore. To recreate functional Rumford fireplaces, wide board floors and wide vertical bead board partition walls required a very extended labor of love.
Their timber framed home earned a timber framed two story ell addition with office, sitting room, and another upstairs bedroom as their family grew. Two hundred feet away Bob built a timber framed shop and partnered with another man, designing, crafting and erecting sturdy timber frame homes and buildings, most within fifty miles of their base. Bob played a role in founding the Timber Framers Guild of America as a way to share information, to keep workmanship quality high, and to create a path for young people to enter the tradition. Albie at the same time was writing and publishing the free Masonry Stove Guild Newsletter in a similar effort to start a fledgling masonry heater working group in North America. He was key in forming, with a handful of other folks, The Masonry Heater Association of North America which is still going strong today.
At some point, Bob doubled the size of his shop with a two story timber frame addition and built a block chimney at its center to receive a wood burning stove. When Albie got called into the picture, Bob, Lynn and their young married daughter Hanna and her husband Chris, were all living in the Cape and ell. All three of the Thurrells were teaching at the local Waldorf school in Freeport which is one of the few Waldorf schools around with grades 1-12. Bob was teaching sciences and wood working with his Geochemistry and timber framing background. Lynn was a first class teacher which means she has taken two classes (of the same students) from 1st Grade through 8th – teaching all subjects except French and German. She has now taken up another class and is in 6th. Hanna was teaching one of the early grades.
Bob and Lynn had waited thirty years to call us, having known about our masonry heater work all the while. Now they were in the process of selling their home and a good chunk of the property to Chris and Hanna and had the intention of downsizing a bit and taking over the two story, soon to be improved and better insulated, shop addition, leaving room and tools still in the original shop to carry on the woodworking tradition which clearly feeds Bob’s soul. The leading edge of the shop addition was less than ten feet from the two hundred foot zoned set back for a new dwelling so even though the building was already legitimate and standing, there was still a need to seek a variance to be able to convert the building into a dwelling. (As I drove home this morning from an early morning appointment, there was story from Haiti of the families who had been inhabiting the median strip of a six lane highway for the past year waiting for some kind of government relief. Now about one thousand small rough plywood houses with a concrete floor and a tin roof were being provided and families of six were tearing apart their tiny North Lane to South Lane abutting median strip shacks to get ready for their move).
The variance came through and we targeted a late fall date to start their heater. We wanted to build connecting to the original block chimney, and the best orientation to the living space and new planned layout was a corner heater backed up to the chimney and facing diagonally into a longish and narrow living area. A normal corner heater has straight line facets to form a pentagonal shape. Lynn, however, wanted a rounded feminine form and a stucco finish along with a heated bench capped with local naturally cleft Pownal granite. Albie drew up a conceptual sketch and once this was approved, drew up a scale foot print sketch that all agreed would work. He then made a trip to the job site and drew the plan out full scale on the floor, showing both the heater and bench lines as well as the set back lines 2″ further out for the framing beneath the floor. While Albie worked on a stone heater project in Wilton, Maine, Bob cut and reframed the floor and with a little help from the carpentry crew, formed and poured a large footing in the crawl space basement.
Bob hooked up a wood stove to the back side of the chimney and several people, especially Stefan Apse, carried in all the blocks, mortar, concrete pre-mix, bricks, firebricks and flue tiles where they could be dry and warm and readily accessible. Stefan and Albie built the foundation on the footing that Bob had prepared and did numerous forty five degree angle cuts on 4″ thick concrete block solids double stacked, to create the pentagonal corners and support needed for the capping pour to follow. With so many wet saw cuts to make, Albie and Stefan assembled a plastic lined box below the saw and stapled plastic sheets to the wall and let them drape into the top of the box to catch the spray generated by the saw.
Bob came in every morning before dawn to pull wires, putter and start the wood stove and stayed until just before his first school class and often returned late in the afternoon to join us once again. As we neared the floor level with the foundation block, we formed up for the large curved bench pour which would cantilever out over our angled block work. We took a long 10″ tall strip of l/4″ plywood and bent it into a curve. Bob cut a series of backing braces and blocks so that we could adjust the curve and once we had it where we wanted it, we screwed the backing braces to the floor and the plywood to the braces. It was easy then to trace the inside edge of the curve and for Bob to then cut to the line with a reciprocating saw. With the curve in the floor cut out we still had the requisite 2″ clearance from any framing members even at the closest points of the curve. On the floor joists below the floor, we cut out and fitted tightly to the block work and screwed to the underside of the floor joists one or more flat 2″ by 4″ or 8″ or 10″ planks to give us a base to drop the curved plywood down on to and to give us a floor for our cantilevered pour. Any joint was covered with blue masking tape or duct tape and slight height differences were adjusted with nicely fitted pieces of cedar shingles. We dropped the curved plywood down into the hole and secured it on the back side of the curve with small blocks of wood screwed to the flat members and we shimmed out the top just a little bit with a series of cedar shingles along the length of the curve and screwed through the plywood and shingles into the floor decking to give us a stable curved concrete form which could be easily removed after the pour. One cedar shim shingle behind any pouring form board will, when removed, always give just enough room to release the form board. Once the flat lower decking of the pour is removed, it is an easy matter to drop the forming side boards into the basement crawl space. We calculated a centered ash dump and made up a plug for the ash dump out of two pieces of blue styrofoam, each measuring 9″ wide and 12″ tall. We put cedar shingle shims between the two pieces of styrofoam and taped the whole assembly together and inserted it slightly into the hole we had cut in the two layers of concrete board which would be the base support for the pour. I usually duct tape tabs around the base of the plugand sometimes drill in long screws to brace the plug during the pour. Our photos may also show a fairly heavy angle iron across the void to support the center of the pour under the double layers of concrete board.
We cut a quantity of 1/2″ rebar and tied it together at every joint with speed ties and set it up on concrete shims within the oiled form that we had created. All the corners and seams were sealed with tape so that the pour would not leak. Albie marked a level line on the form 3″ below the floor decking to leave room for the Skamol insulation board which we put on top of the concrete pour. Bob intended to add a 3/4″ ash floor on top of the original decking so we knew that 3″ from the current floor gave us plenty of room for our insulation board plus a mortar joint. Albie ran out of time to start the pour after the rebar was finished and was concerned that the pour would have been ideal to do before the long weekend ahead. Adrian, the builder, suddenly stepped up and volunteered to loan his crew and himself to work with Stefan to mix and pour the concrete that evening before the weekend. Albie knew that this job was special, special in many ways, one of which was the remarkable co-operation and generosity of all the contractors and helpers as they assisted one another. I think that Bob and Lynn, both remarkable and generous people, inspired this spirit on their site and it was always a pleasure to be there every day. After the foundation of the masonry heater was completed, we were joined by a third team member, our mason friend Ryan Neidhold of Vermont who has worked on many heater and oven projects in the past couple of years with Albie.
On top of the foundation cap slab we laid 3″ of calcium silicate (Skamol) board, to which we stapled aluminum foil, so that it would not so readily absorb the moisture in any mortar applied to it. With a base course of common bricks, we filled in the center of our heater base and also laid up six courses of veneer brick. To create the desired bow curve around the front of the heater, we made several skew cuts on the ends of the common brick to maintain tight joints. We also located and created openings for, and mounted, several small airtight clean out doors, giving access to each of the three downdraft channels as well as all parts of the long curved bench. We shimmed out each of the five or six clean out doors and ash box door approximately 3/8″ to allow for the stucco coat which would follow to come flush to the back edge of the soot door frames. These shims we cut from strips of 3/8″ wood on the job site. After a day, the doors and wire ties set up firmly enough and the shims can be easily removed. While they are setting up we typically get them leveled and plumb and then hold them into position with a short stack of dry firebrick in front of each door.
The core, set at a 45 degree angle to the brick veneer of the heater, laid up easily, leaving room for three identical downdraft heat exchange channels on the two sides and rear of the core. As we neared the top of the core and channels, we cut a by-pass channel hole into the back side of the block and tile lined chimney, almost opposite the spot on the far face where the wood stove was plugged in. Once the hole for the by-pass was completed, we plugged it temporarily with a panel of 3 Skamol board with a layer of ¼ mineral wool around it and this worked fine to create a smoke proof and safe environment while we moved towards the actual installation of the by pass channel when the veneer wall reached that point.
We also had to cut, much lower down, on the side of the chimney, a similar hole for a second by-pass channel to be located where the bench entered the chimney. When a chimney is already built, we do not try to cut a guillotine damper into a tile lined brick or block chimney and we prefer not to use a chimney top damper as some masons do. Instead, we do a spring loaded base exit by-pass channel. By adding large washers and a short stiff spring section, we can allow the user to have a range of settings from fully open to fully closed. A base exit damper also should not be a guillotine damper because it is likely to stick out into the room and have somebody trip over it.
From the right rear down draft channel to the right side down draft channel, and picking up the gases from the left side down draft channel through the underfloor common horizontal channel, all the exhaust gases exited the heater at the far right side of the long curved bench. The first flue tile exiting from the heater is laid on edge and gasketed against the down draft channel base opening. Turning the corner at the right side of the bench, we turn the tiles flat and cut them with skewed ends to follow a faceted shape along the curve of the bench. The first flat tile is fitted to the upper two thirds of the first exiting tile on edge. Square holes opposite the soot doors are also cut into the tiles. Additional support under the flat tiles which come to just below the top of the 6th common brick course, is provided with solid concrete blocks. Bridging the ash chamber channel, we covered the flue tile in that section with a stainless steel sleeve. All the tiles were dry fitted and laid in place and at the far left corner, we again turned the tiles on edge to make the entry into the chimney. Once everything was dry fitted, we started at both ends and worked towards the middle. Each tile is set on a sheet of ¼ mineral wool with wool on either side of the tile as well. Each tile is bonded to the next with refractory mortar and when the joints are sponged clean inside and out, we add a flat braid saddle gasket, secured with high temp silicone clear caulking, over the joints and then add a final layer of wool on top of each tile. The last tile we installed was to the right of the stainless steel sleeved tile and this was double buttered and dropped into place with strings wrapped around its belly. Surplus mortar is sponged off on the inside through the clean out ports. The tile opposite the left side downdraft channel had to have a hole cut in its far side, towards the core, as well as a matching hole on the veneer side to give access to that channel. We put a gasketed plug in the hole towards the downdraft channel so that all the draft would flow to the far right corner of the heater. The plug would give the Thurrells access to this channel once a year when they do their annual cleaning with a shop vac.
When back in Norridgewock over a weekend, Albie went out to our stone yard and loaded up a few hundred pounds of 1 – 2″ thick granite and soapstone cut off pieces and brought them back and inside to the job in Pownal. With the curved bench and the curved face and side, we wanted a way to fill the voids without slush filling wet mortar tightly against the mineral wool gasketing. In a standard heater, we often have a small gap between the gasket and the back of the veneer wall which we carefully fill with mortar without trying to push it in or pack it down. In the bigger voids in the curved bench and again in the voids on the side and front walls, we laid in 1 – 2″ thick pieces of stone gently against the mineral wool gasket and then slush filled the little remaining gap between the stone and the veneer wall. This allowed us to retain the free floating “Doll inside a doll inside a doll” principle in our construction and dramatically reduces the risk of cracking in the veneer from thermal stresses.
Knowing that the finished brick work was going to be covered by up to 3/8″ of stucco, we purposely did not obsess about plumb lines or perfect curves in the layout of the brick, knowing that everything would be smoothed over and organically finished with the stucco. Had the plan been to leave the brick work exposed, we would have had plumb lines at several points on the curve and would also have likely used a curved convex plywood template to check each course. Instead we used our eyes and our four foot levels to keep the project from wandering much out of plumb or level. To follow the gentle arch of the Future Series Loading Door we faced the challenge of filling the space behind the curved brick work back to the flat facet of the core and also creating both a lateral curve and a curve of the edge of the arch itself. We noted that by laying the bricks on their edge with one end towards the core face and the other towards the curve of the veneer we could custom cut both ends of every brick to the approximate desired shape. We did not, however, have a radical enough arch to allow us to cut wedge shapes with each brick as one might do with a “taller” brick arch layout.
When an arch heats up and expands, the normal wedge shape of the bricks keep the bricks securely in position, even if a hairline crack develops, but with our required layout we had no such wedge form protection. After some serious head scratching, we came up with two ideas which seemed to work. First, we cut some scrap metal diamond lathe (for wall stucco applications) and cut a piece of it to “spring” under the arch layout of the brick and create a web structure under the brick arch which would eventually be covered with stucco. The metal lathe would also give the stucco something good to grip to under the arch. Secondly, we wove through the wire mesh at every joint a double tie wire loop and then laid the ends of each loop down flat on top of the bricks on either side of each vertical joint. This in effect “cinched” the bricks into position and to the wire mesh support so that everything in the arch would be locked together and mutually supporting. The front of each arch brick was gently curved on a radius to soften the feeling of the opening. The arch over the oven door we even made a little proud knowing that when stuccoed it would have a slightly raised “eyebrow” quality to it as another subtle accent. Scott Barden did similar curved arches with factory radius molded bricks on an earlier heater for a family in South Freeport which Albie liked very much and tried to emulate in this project.
For years, driving through this part of Maine, Albie had notice the uniqueness of Pownal’s granite, seeing many old posts and mile markers at numerous intersections in the area. The tooling on the granite sentinels indicated that the stone split large flakes when dressed by the early hand tool carrying masons. This grain structure of the stone helped to create a beautiful sculpted, versus a machined, look to the finished stone. As luck would have it, Bob and Lynn were already familiar with and very fond of the unique Pownal granite. One day Bob took Albie down the road in his old flatbed pick up truck to visit a one man active quarry less than five miles away. The quarry covered two or three acres. It was not deep or water filled. You could quickly see that the Pownal granite presented itself in layers, some as thin as 2 or 3″ and some as thick as a foot or more. The owner could quarry the stone with a back hole and bucket loader by prying loose and picking up large sheets of the stone and then could work it to any standard or custom size with cut off saws, drills and feather and wedges. We were looking for a large piece about 3″ thick from which to make our bench stones and leaning vertically against a wall we found a piece about five feet by seven feet that seemed perfect for our needs. Then we bought two or three smaller 3″ pieces to supplement the big one should we need more material. We cut the modest stone for the oven shelf first from one of the smaller pieces to see how it cut and chiseled as a kind of trial run for the bigger stone.
As we neared the top of the heater in our brick work, Ryan took on the task of templating the entire bench first with cardboard and then armed with these carefully fitted pieces and a gas powered cut off diamond saw, went outside to see how many of the bench pieces he could cut out of the one large naturally cleft stone. Cardboard laid flat on the ground can fit piece to piece quite perfectly, but a naturally cleft stone, once cut, when laid on the level support walls below it, and intended to be level above, does not behave nearly so tamely.
Ryan cut all the pieces beautifully with the saw and then Ryan and Albie did much of the curved stone face live edge chiseling. When we went to lay these naturally cleft stones, we found it very challenging to achieve a level top surface with matching head joints and ultimately had to split some surface off of one of the bench stones, all the while concerning ourselves with exposing fresh rock, versus the natural surface, and after lots of trial and error experiments finally achieved a look that we were very very happy with, knowing that there are few sun heated natural rock ledges anywhere that are perfectly flat, and that this stored solar energy heated bench, while not perfectly flat, would be both lovely and extremely comfortable to lay on.
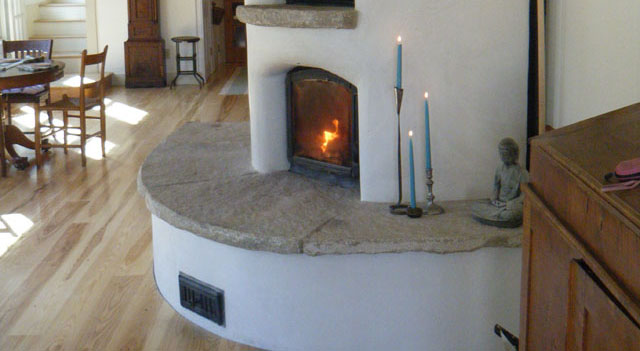
A week or so after the stucco work was completed by our mutual friend Noah Wentworth and with the heater on line, so to speak, I pulled in late one afternoon and let myself in and took a sit and a lay down on the gently heated bench and was very comforted by the beauty and the embrace of the heated stucco and stone.
The natural world does not present itself as level and plumb and square except perhaps in certain crystal forms but even the extraordinary crystal forms of the cooled basaltic columns that I recently wrote about from my Yellowstone trip, are vertical, but never plumb, and are crystalline in form but never regular in shape. We built the core and much of the veneer using very uniform rectilinear shapes and the core itself is based on a very linear and squared off design. To have Lynn request a more rounded and feminine look was a nice challenge and we were very very happy to work with them to achieve this more organic and feminine feeling. Beauty is in curves. When I laid on the curved gray Pownal granite, this grand white lady’s heart was gently pulsing with warmth and with love.
