
In June of this year, Albie Barden of Maine Wood Heat and Ryan Neidhold of Vermont, traveled to Harvard, Massachusetts to install a model 83 Le Panyol turnkey oven with a stainless steel base pan and copper dome. Scott Barden and Brock Harmon in our shop re-cut and trimmed and dry stacked and numbered all the standard model 83 Le Panyol pieces for the turnkey installation but did not assemble the oven permanently, because the yard location for the oven installation was t wo or three hundred feet away from the driveway with no easy way to move an assembled oven to the oven site. Albie returned from an ongoing large heater project in Harpswell, Maine and hooked up his truck to the fully packed company trailer, which included a strapped down, large, lightweight, but heavy hauling, utility cart with a load capacity of several hundred pounds that Scott had bought at a recent equipment auction.
The long cart path down the far edge of the property dog legged by a huge pile of warped and torn sheets of thick oriented strand board (OSB) that the oven foundation builders had used to bring in thousands of pounds of stone and some pretty heavy machinery across a beautifully manicured lawn.
We delivered all of our oven materials, the copper dome, grog, dome elements, etc., with four or five cart trips and covered each pile of materials with new tarps in case it rained.
We had seen photos of the completed oven base before we arrived, so we knew what to expect and that it was beautiful, but we were still moved by how well placed and how beautiful the foundation was and is.
A few months ago, Albie and a friend had spent a couple hours online looking at literally hundreds of oven installation photos, many with stone foundations, and we were surprised by how unbalanced most of them looked, with huge outsized wood boxes and poor relationship to the oven mass itself. We were, at that moment, designing a stone foundation for Albie’s friend’s oven and we wanted it to be both beautiful and functional and balanced for her to work with and look at.
The defining element for her foundation were two gorgeous limestone footing columns that we dug out of the ground. Each column was part of her old barn foundation and each column was buried three feet in the ground tightly packed with smaller stones around it.
Over the Fourth of July we finally placed a heavy granite lintel from Maine Pownal granite which Albie had found and bought while working on the Pownal, Maine Thurrell project and had brought to New Jersey in an earlier trip.
Trimmed with hammer and chisels and rolled on planks and then lifted into place with a chain fall, it makes a wonderful addition to the evolving stone veneer of hand cut limestone salvaged from the old barn foundation on her property.
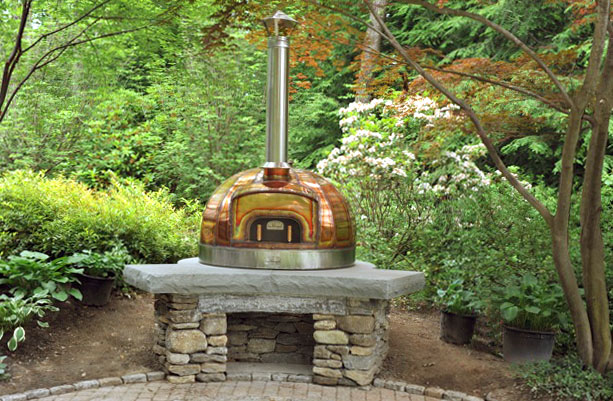
An oven designed to last for a generation or more should be beautiful as well as functional and the foundation at the Harvard home was both. We were contacted several months ago by the landscape designer and architect Roger Washburn who told us that he had a client in Harvard, Massachusetts who was interested in one of our copper topped ovens. We provided Roger with the diameter, height and weight of our turnkey 83 copper oven and Roger took the project under his wing in earnest. Roger took time and care, consulting regularly with his clients and presented them with a concept that placed the oven at the 9:00 o’clock perimeter position on a round masonry circular patio placed just beyond the lower level exit from the home.
The stone foundation for the oven related to other stone walls and steps around and directly serving the home. The house itself, built thirty or more years ago by the family (and constantly being refined and improved upon) is set on a slope.
The walk from the driveway to the main deck that wraps the side of the house at ground level and becomes an upper level behind the house, is accessed by a series of long steps made from large thick slabs of bluestone. The riser or face of each thick bluestone slab is hand chiseled with large elegant flakes defining each slab face. Roger picked up this motif of the thick bluestone slabs in his oven design and capped the foundation with two sawed and shaped six inch thick bluestone slabs, tightly joined at the center.
The chief cook in the family requested generous working surfaces to the left and right sides of her oven door. The aspiring baker gave his blessing as well to the design and her priorities. Roger’s design, looking down from the upper level deck or the trees, created an oven foundation cap that reminds me of an Omega symbol with a horseshoe circle rear curve and balanced legs off to each side. The perfectly matched pair of sawed, leveled and chisel faced cap stones gave us a stunning base for our oven assembly work.
Beneath the pair of cap stones, a mason had spent a day cutting and chiseling a curved Corinthian granite lintel to cap the modest wood box below the oven opening. Roger’s design, we hope, will inspire other folks to consider something similar when they wish to do a round base for a Le Panyol oven at a perimeter location on a circular or non-circular masonry patio.
June rains stopped once we arrived and our carefully tarped piles received little or no rain and we worked in sunshine throughout the project. We positioned the oven on the base with a seven-inch equal border from side to side and at the rear. The side extensions and the front apron were deeper. Pencil marks on the stone slabs kept our layout honest. We usually set our turnkey oven pans on 3/8 inch thick small four inch square stone tile shims to allow for water evaporation to occur beneath the pan.
Our client had twelve inch square remnant tiles in hand. We tried unsuccessfully to cut 4 inch by 4 inch tiles from the larger tile with our diamond grinder, but the segmented teeth vibrated the slate and caused it to delaminate every time. After destroying two foot square tiles, Ryan and I drove to a nearby Home Depot and picked up some 6 inch square indoor/outdoor ceramic tiles which we laid out in two circles plus a center shim to support the oven in its pan. We set the metal pan in place but it rocked on the center shim, so we removed it and trusted the two circles of tiles to hold the oven adequately as the pan is fully reinforced with six five inch high reinforcing ribs. We dry laid the numbered pre-cut pieces of three inch thick calcium aluminate Skamol rigid insulation board and then poured in fired and ground up Terre Blanche (white earth) grog to blue tape lines we had preset around the pan. Scott and Brock had sent us a measured and stepped screed board from Maine to level out the grog. Using weighted rubber mallets and short 2 inch by 8 inch blocks of wood, we settled all the grog with lots of mallet-on-block pounding, and moved the blocks bit by bit across the entire surface of the grog layer until the grog was very well compacted. The balance of the grog we saved to feather under each floor tile as we laid and leveled each row from the center tile out to each side and from front to rear. Near the rear, out beyond the dome perimeter, we added a bit of masonry scraps to the grog to get the grog height at the rear edge up to the level of the whole.
The oven dome went together smoothly. We located the lintel element and smoke throat elements centered on the stone cap center line and spaced them back about 1/2 inch at the smoke throat element corners to leave plenty of room for fitting the copper dome and did a trial fit (one of about three or four fittings) of the copper dome and then returned it to skids under the deck. With the position of the lintel and smoke throat elements and keystone clear, we marked them with pencil and then bonded them to the floor and one another with clear high temp silicone caulking and then clamped a two by three inch by eighteen inch straight edge to the front three elements of the smoke throat assembly to hold it together and tightly fitted while the caulk set up.
By keeping the eighteen inch long piece of two by three stud below the top edge of the smoke throat elements we were able to work on the oven and the smoke throat adaptor without removing the straight edge until the three pieces had fully cured. With the keystone set and the lintel and smoke throat elements in place, we laid in the first two straight voissoirs, one on either side of the lintel element and tipped slightly forward to make a tighter fit with the keystone. The bottom edges of the voissoir elements were rounded slightly to allow for this slight tipping and we used wooden clothes pin halves as perfect little temporary wedges to hold the voissoirs at their tipped forward position. We marched around the oven fitting all the voissoirs perfectly until the last tapered voissoir which was just a bit too tight, but with a couple taps of the rubber mallet on the adjoining voissoirs, room was created for the last voissoir dome element to slip in. Ryan also used a technique to shift voissoirs around a bit that I had never previously used which was to slip his trowel under the base of the tipped voissoir and to gently lift and pull the base out a bit and this was very effective along with the interior and exterior mallet tapping for a little fine tuning of the voissoir layout so that the base circle was smooth and the fit at the keystone all even and at the same level at the ceiling of the dome.
We wrapped the base with two tight strands of tie wire anchored to long tapcon screws drilled into the base sides of the lintel element and then packed any open top joints with single folded sheets of paper towels, tucked into place by folding each small piece in half over the side of the trowel blade and using the trowel to slip it into the gap. The half voissoirs over the lintel we trimmed back at the base about 1 ½ inches and drilled and screwed into position four short perforated galvanized angle iron sections, one behind each half voissoir to avoid any shifting of the half voissoirs during the life and use of the oven. We used pan head short tapcon screws to secure the angle iron strips and to keep the screw heads as close to flush with the strips as possible. With the half voissoirs and the galvanized angle strips in place, we then mounted the stainless steel smoke throat adaptor on two layers of high temp flat braid fiberglass ribbon gasket with a bed of high temp silicone between each layer and tapcon screwed the adaptor into place with the four holes already drilled in the corners of the adaptor and us drilling corresponding holes in the smoke throat and lintel elements. We use hex head tapcon screws for this final mounting.
We sprayed down the dome several times with a hose to get the highly absorbent Terre Blanche wet enough to receive the refractory mortar skin coating. We poured mortar into the open top gaps first and then pargetted the entire dome with Ryan passing Albie cut off half bottles of pretty soupy mortar which Albie applied with a rubber gloved hand and a small trowel.
We also filled the gaps beneath the base elements, removing the wooden clothes pin shims as we went around the base. We let the mortar skin set and dry for several hours and then applied four (inch thick) fitted layers of a very high quality high temp ceramic bio digestible (lung friendly) blanket insulation. The insulation comes in long rolls so sections are draped across the dome and then the pieces are folded over tightly with overlapping sections cut out and the new shapes joined at their edges. In subsequent layers, we avoided putting a seam over a seam. We drilled and screwed in three 2 ½ inch by ¼ inch tapcon screws on each side of the lintel element and used these screw heads as anchor points to wrap tie wire tightly in hoops at different angles over the blanket insulation on both the final layer and some intermediate layers.
For the final copper dome mounting, we used three people instead of just two and everything slipped nicely into place. Even as oven and masonry heater professionals, both Ryan and Albie failed to realize that the new series stainless steel rounded cap mounting machine bolts were designed to be screwed in with a hand held wrench versus a torque head driver drill, Albie managed to snap off a bolt in the stainless base pan threaded hole before he realized the error of his vision and method.
Scott and Brock had provided Albie with a little piece of cardboard with a green torque head bit and a larger black head bit and a correct Allen wrench with little notes and drawings to explain which was used where, but old habits are blinding and neither of us got the message straight. Luckily for us, our client had a machinist background, among other things, and a fully equipped shop and he quickly produced a small center punch and and tap and die set to help us solve our problem. Albie started with a very small bit and then worked his way through three or more subsequent larger sizes. Out came a metric drill bit designer for the quarter inch tapping tool and he finished the hole with that and then cleanly re-threaded the hole. As soon as Albie got home he humbly sent down the new rounded cap machine bolt and a couple of spares and the oven dome was complete.
The stainless smoke stack and the cap and collar mounted smoothly and we shimmed the base connection firmly in place and plumb with strips of the high temp fiberglass blanket. In little trees to the left and right of the oven, tiny nearly invisible spot lights had been mounted and wired in place to illuminate the oven working surfaces after dark.
With perfect hosts, gourmet snacks and meals, including fresh Snake River Alaskan salmon picked up after an email sent to customers of a local Costco food store, along with this remarkable outdoor setting and gorgeous base, we were delighted with our roughly twenty hours (times two men) of effort on site to create an oven to use and to behold. We look forward now to cooking and baking feedback from our new found Harvard, Massachusetts friends.
